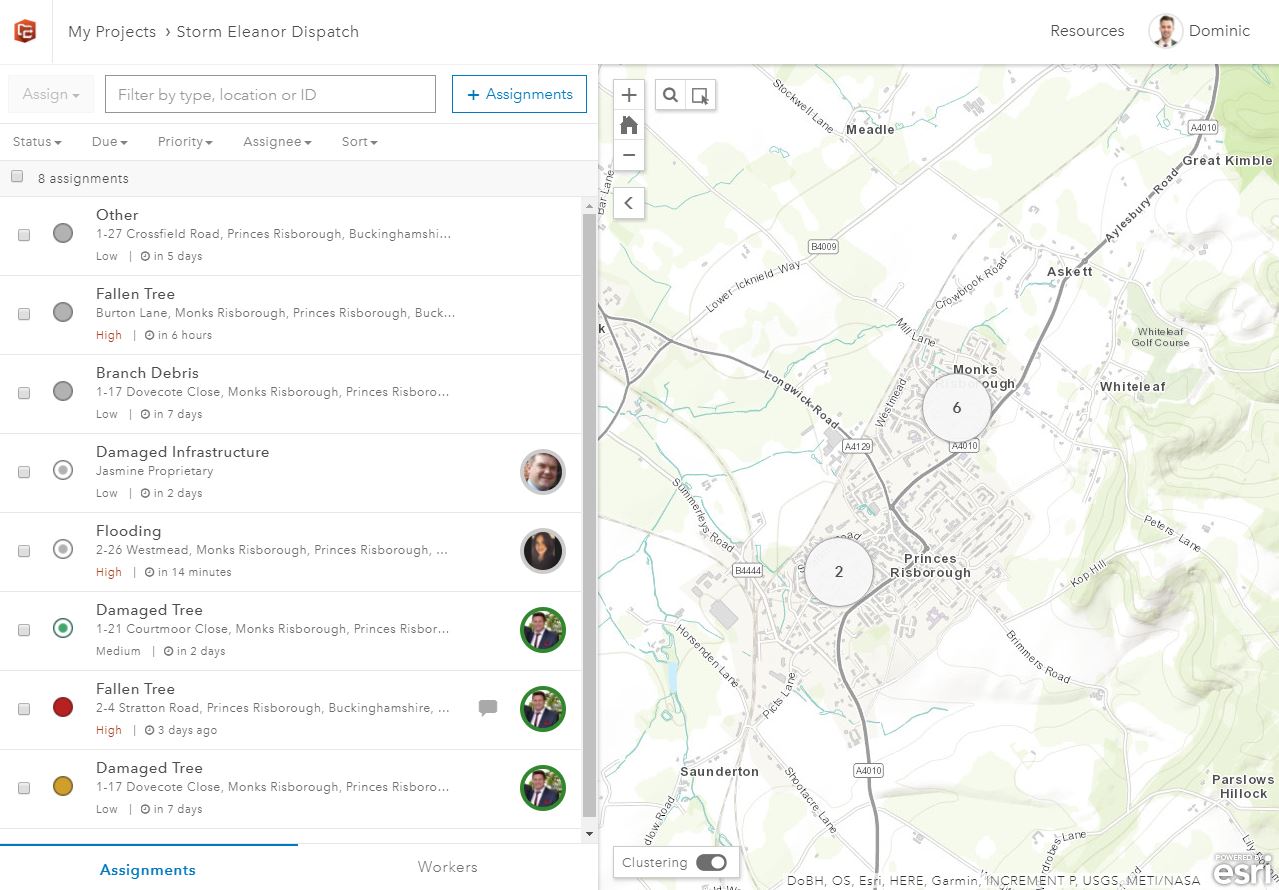
Workforce for ArcGIS is a field force job management solution which uses the power of location in order to achieve better coordination and teamwork and is included as part of the ArcGIS subscription. It features a browser-based web-app for dispatchers and operation managers, along with a mobile application (iOS and Android) for those working in the field. Whether you’re; interested in tracking and following up sales leads in a timely fashion, responsible for valve and meter inspections as part of a utilities network, or just simply want to monitor the locations of your workers in the field, Workforce can act as your method of integration to create consistency across communications.
The basic premise of this is that tasks are created by dispatchers and assigned to mobile workers. In tune with the recent battering from Storm Eleanor, I will be exploring the scenario of recovering from storm damage to show how simple it is to configure your first project – with a few handy tips to help you harness the full power of Workforce.
Getting Started
When creating your project, the first things to consider are the types of assignment and the users that will be creating and completing them. You can add to add to these later, but it is helpful to start with an idea of the types of tasks you will be working with. It is also worth considering whether you want to monitor the whereabouts of your workers through location tracking – as that can be enabled in the configuration also.
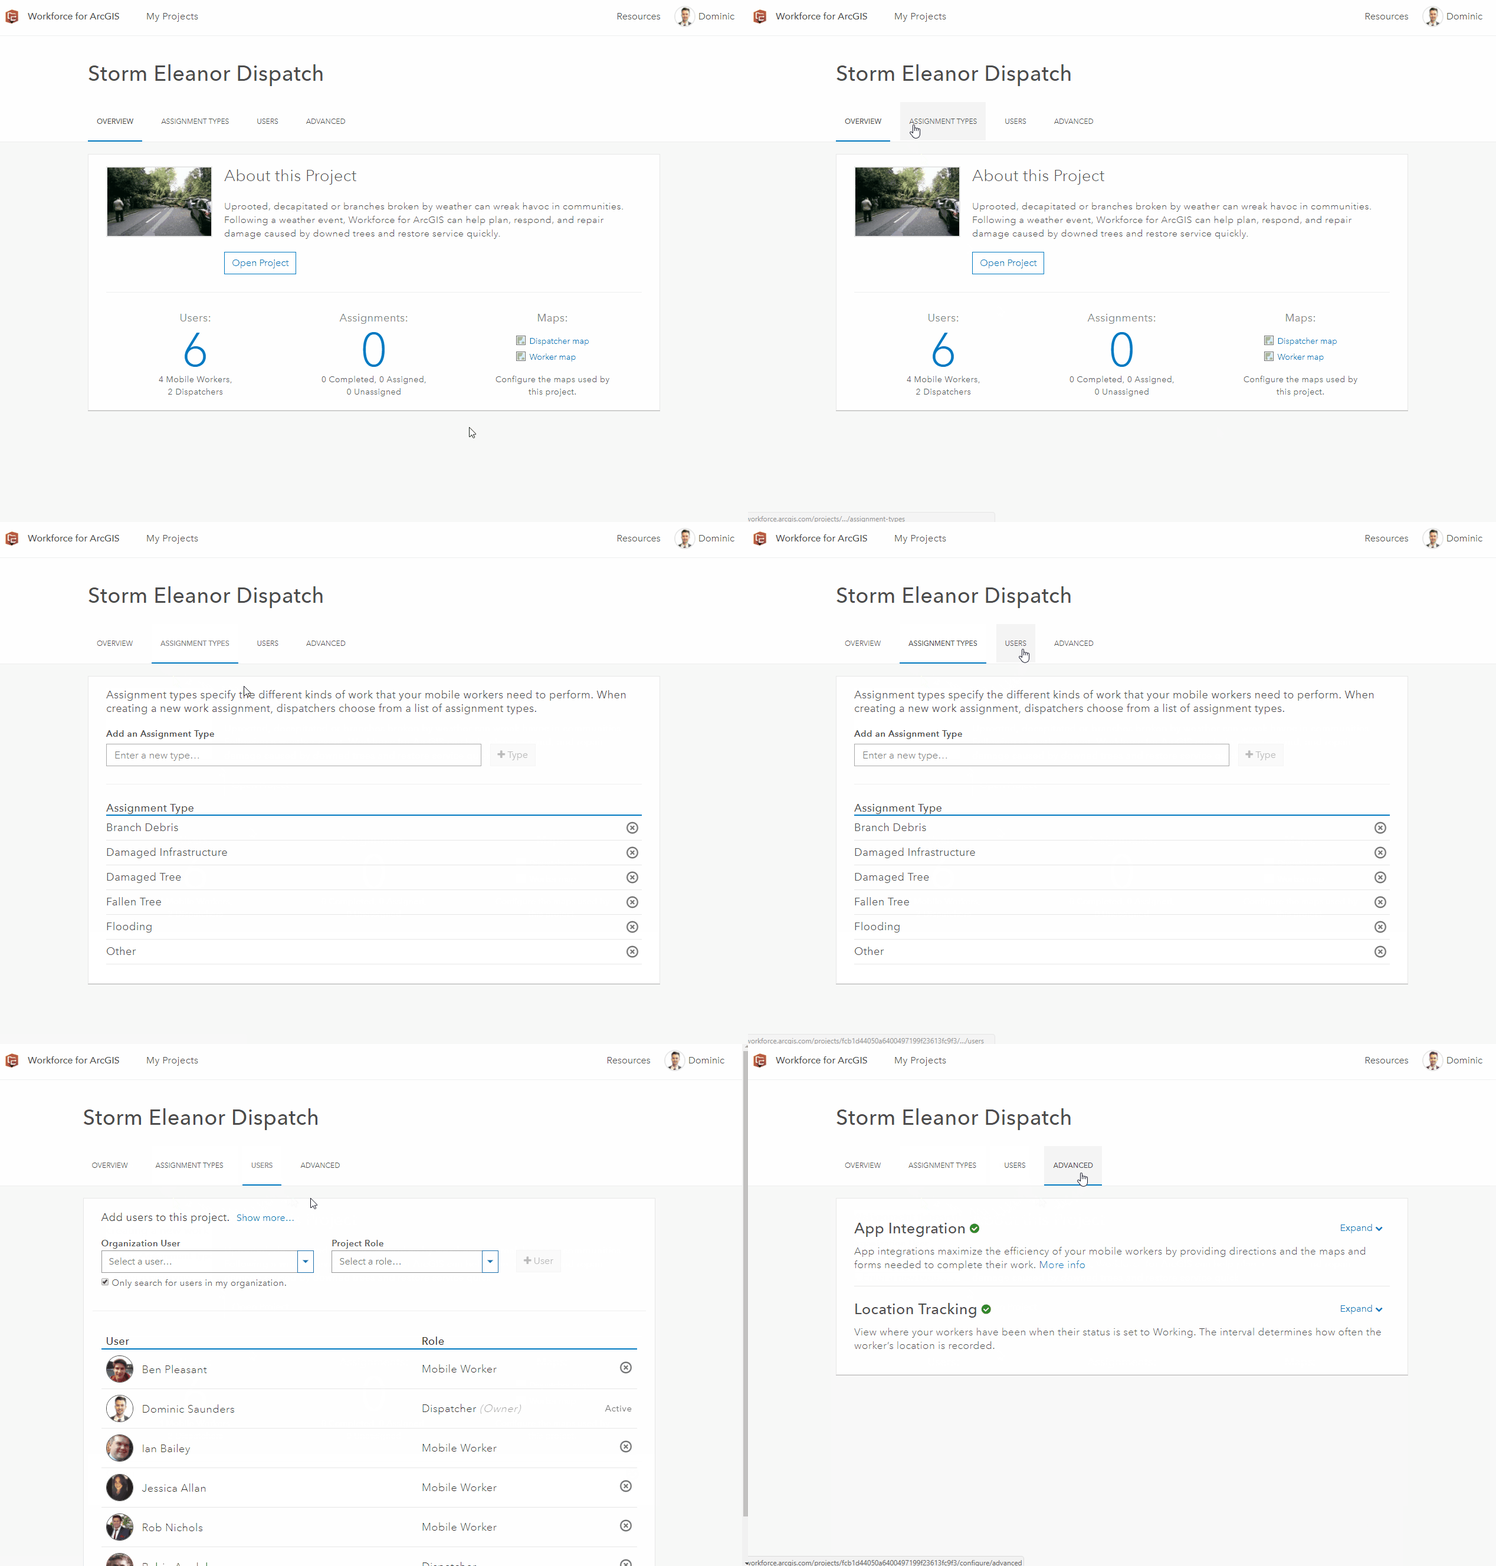
Once these are completed the project is ready to be used, however we may want to incorporate some of our own data to the dispatcher’s or the worker’s map to assist them. In my example, I might want to add a layer denoting tool depots – so mobile workers can choose the best one for each job. The underlying web-maps (created in your content area once your project is configured) can be tinkered with to customise the end-user experience.
Getting to Work
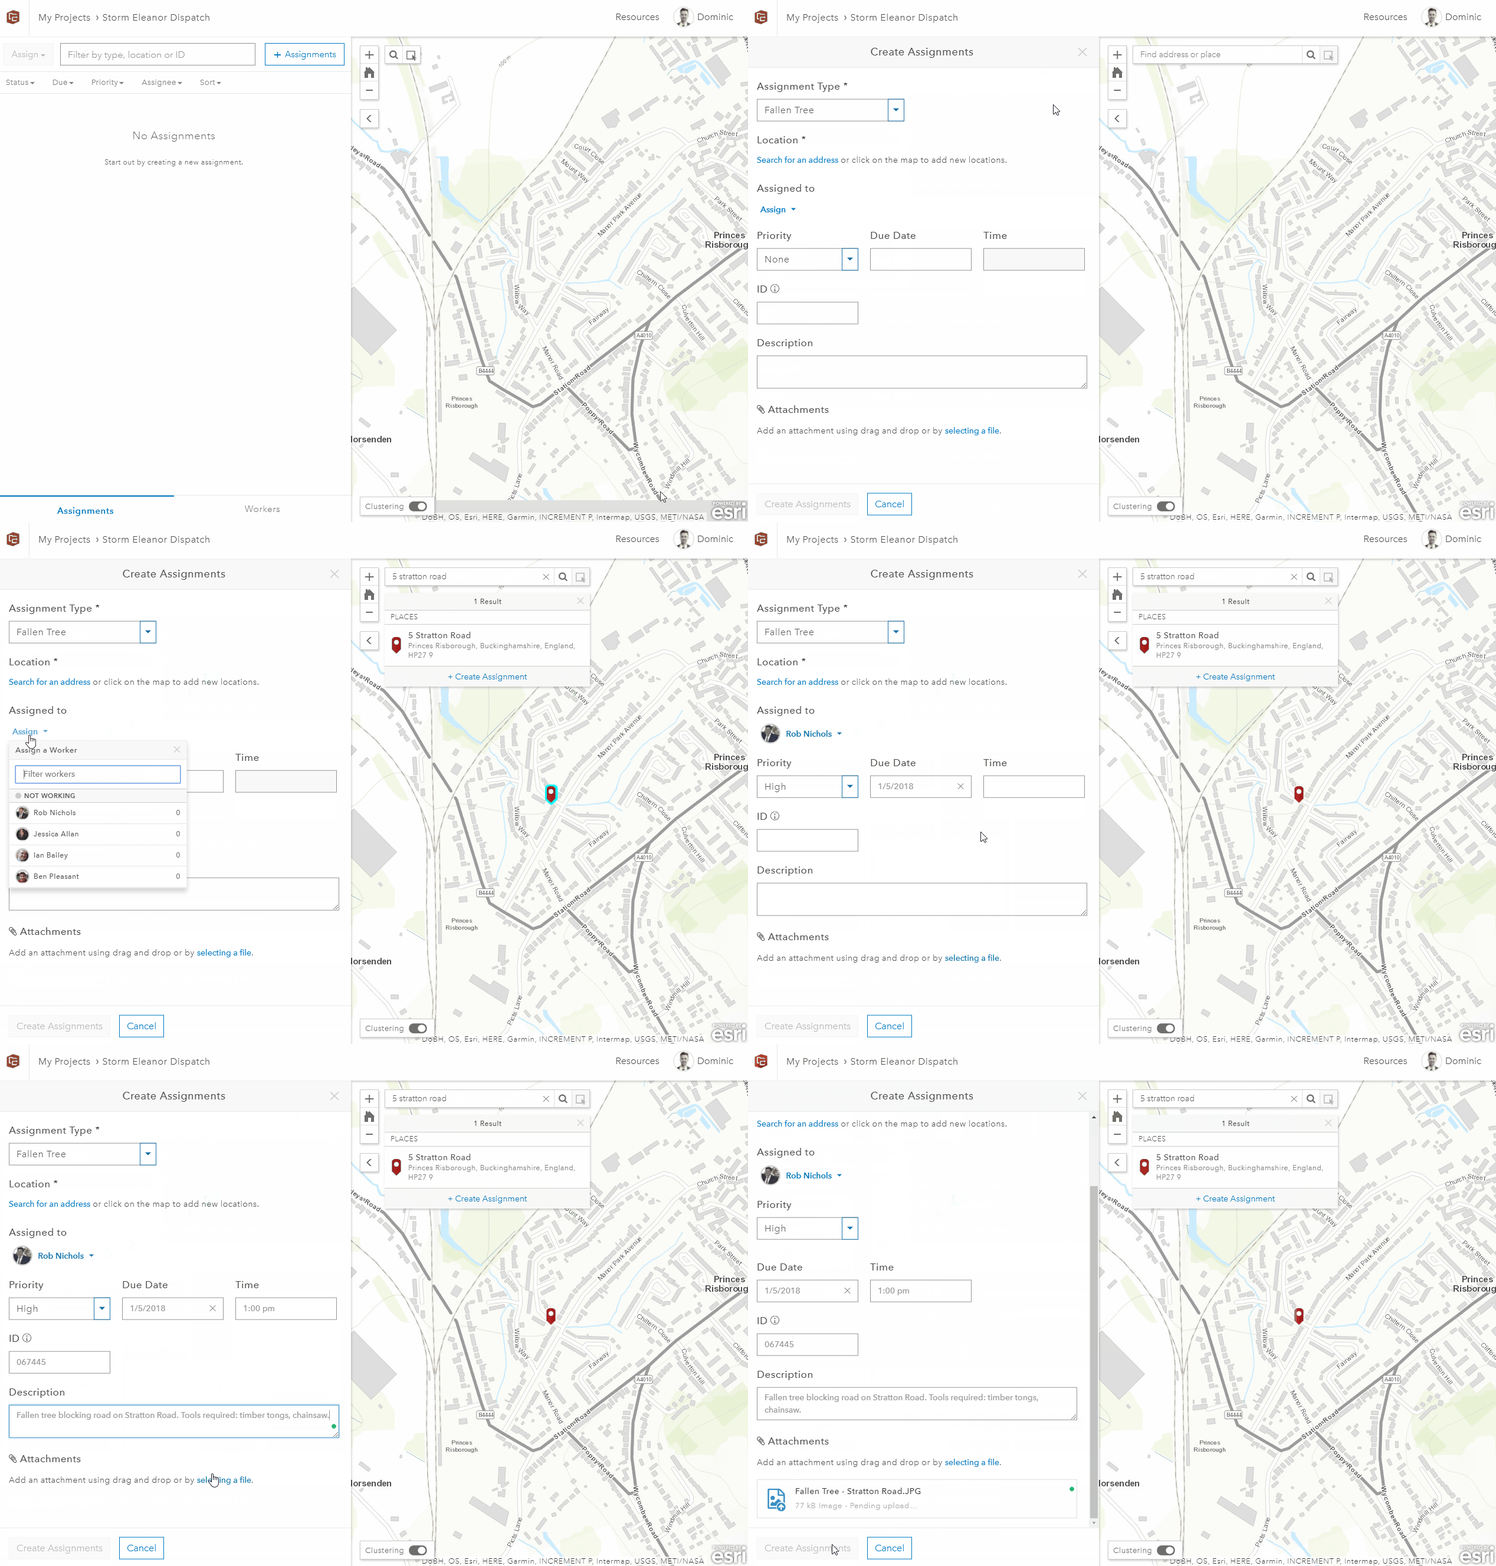
Workforce really shines when both the office and field crews are working in tandem. If we know that we have a mobile worker who is stationed within a mile of an urgent incident, we can recognise that and check to see if they have the required skills and tools – before dispatching them to the scene. First we can Create Assignment in the dispatch view, including the job location, details, severity and add image or document attachments (a new option at 17.0.1). We can assign the job to the appropriate worker or leave the assignment on the dispatch list and allow a mobile worker to pick it up at their own pace.
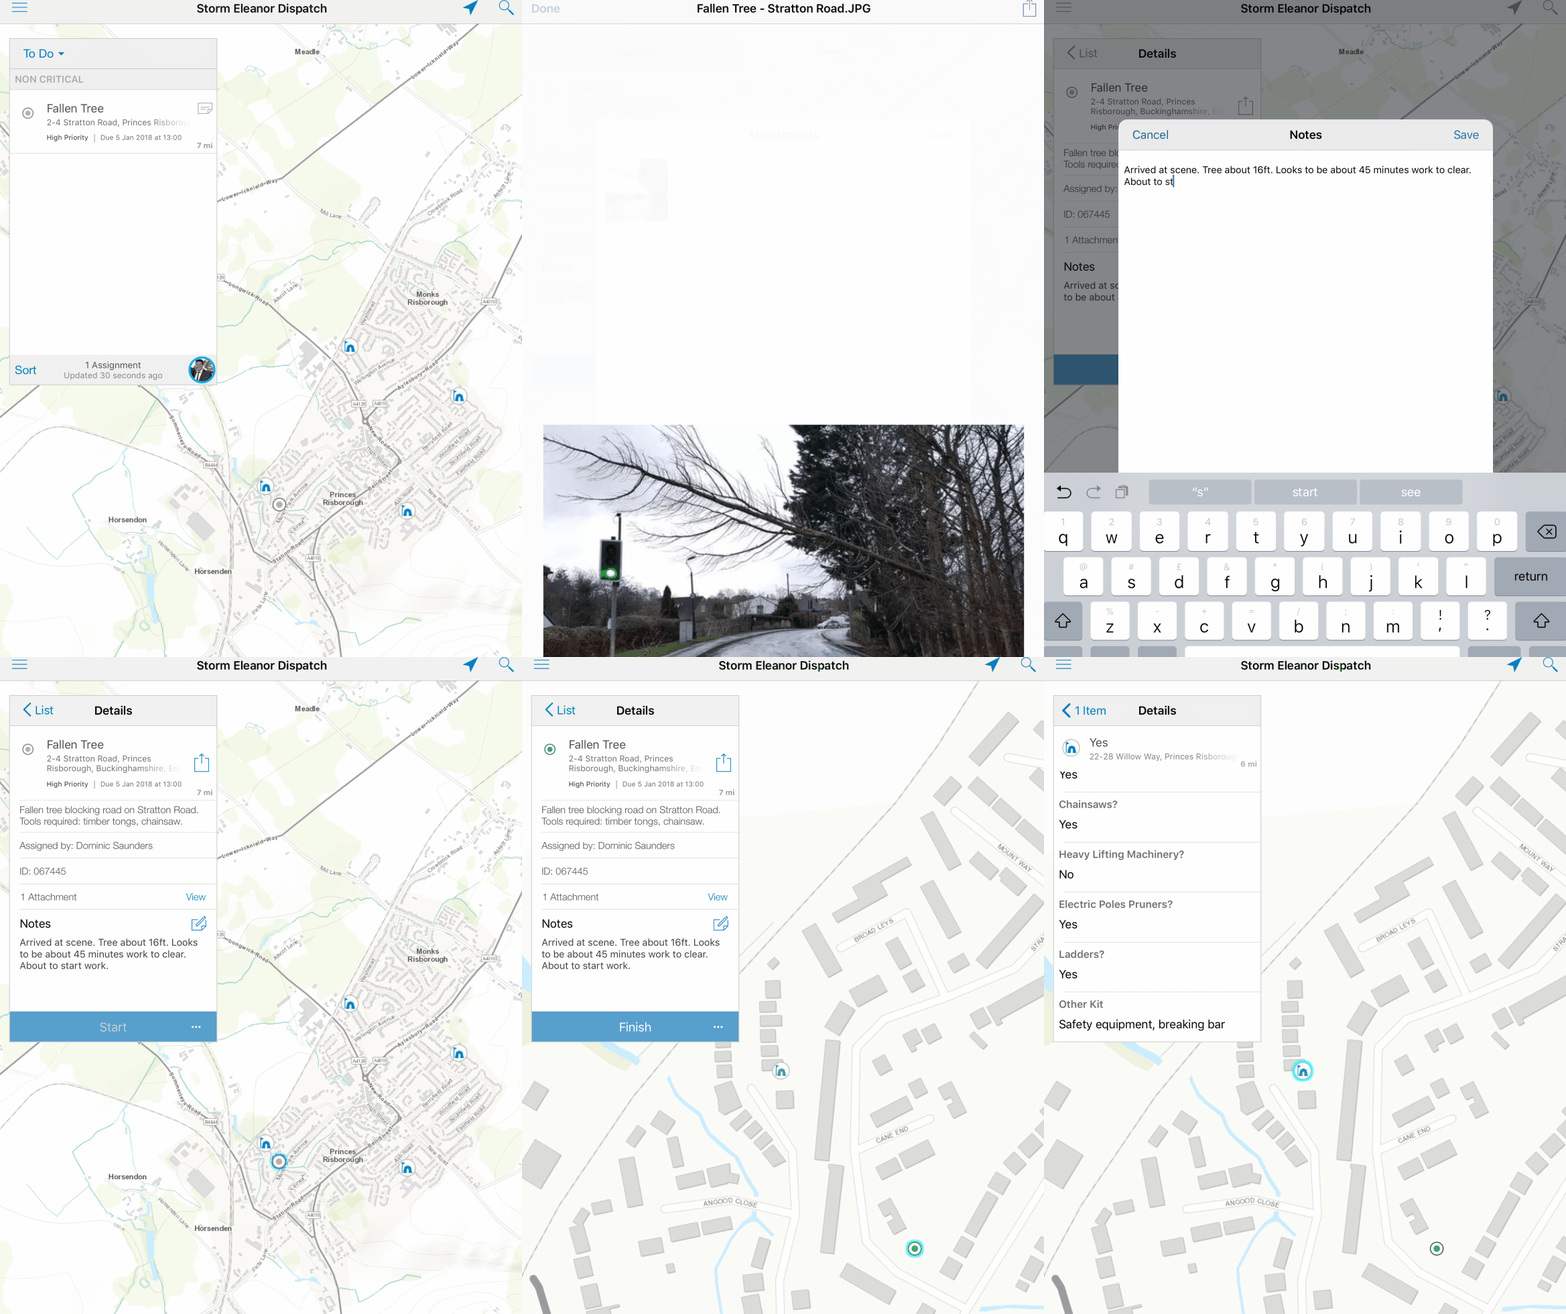
The worker can see their assignments in the mobile app and access the details, including any attachments. In the example on the right the worker picks up an assignment to clear a fallen tree. The worker can either complete the task by selecting Finish once completed. Otherwise, they are able to pause the task, if they are called elsewhere and wish to indicate that they are not actively progressing on it, or they can decline the task if they are unable to complete it (e.g. the fallen tree had already been cleared).
Notice that the tool depots can be seen on the worker map but weren’t visible on the dispatcher map. This is because I chose to use different web-maps for dispatch and field.
Now that you know what Workforce for ArcGIS is all about and have a basic overview of the features it can offer you, I want to share a few tips to help you can get more out of the project creator, dispatcher and mobile worker roles:
Project Creator
1. Depending on the nature of the work to be completed, simply viewing the current location of your workers may not be adequate for control over the project. In some cases, you may wish to enable location tracking, which will output a log of the past positions of your mobile workers as a feature layer. This can be enabled in the Advanced project settings, where you can also control how frequently you wish to set the interval for location updates.
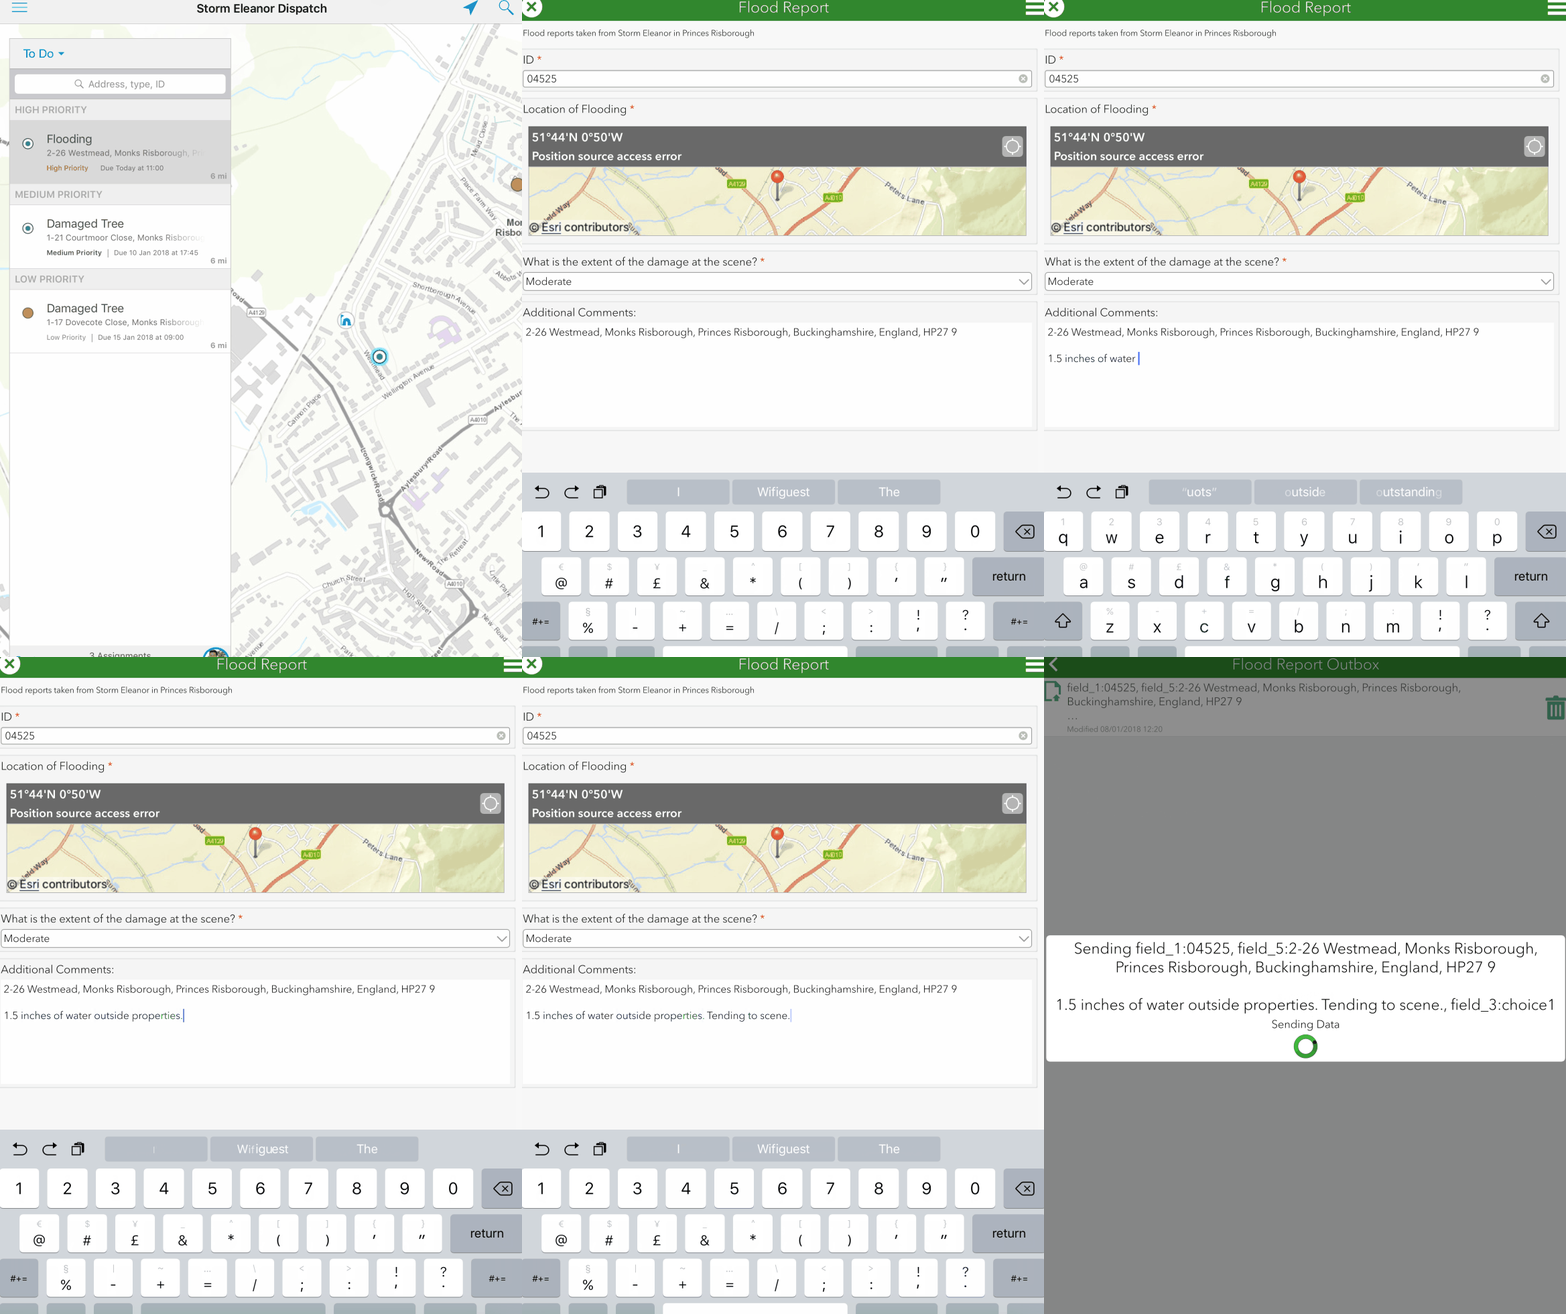
2. Workforce can be configured to launch other Esri apps, simplifying the workflow for workers. By default, mobile workers can open Navigator for ArcGIS to route themselves to the assignment location. Using App Integration in the Advanced settings the application can also be linked to Collector for ArcGIS and Survey123 for ArcGIS (right). This can be a really powerful tool when linked effectively, as repeat fields can be automatically input from Workforce, such as ID and location. This not only saves time in the field, but also prevents repeat records and data errors.
Dispatcher
1. Did you know that it is possible to create assignments from features? That’s right, you can select a feature and click ‘+ Create Assignment’ to create an assignment at the feature’s location. The feature’s pop-up title is used as the location text. This can be helpful in working to ensure that datasets are well connected.
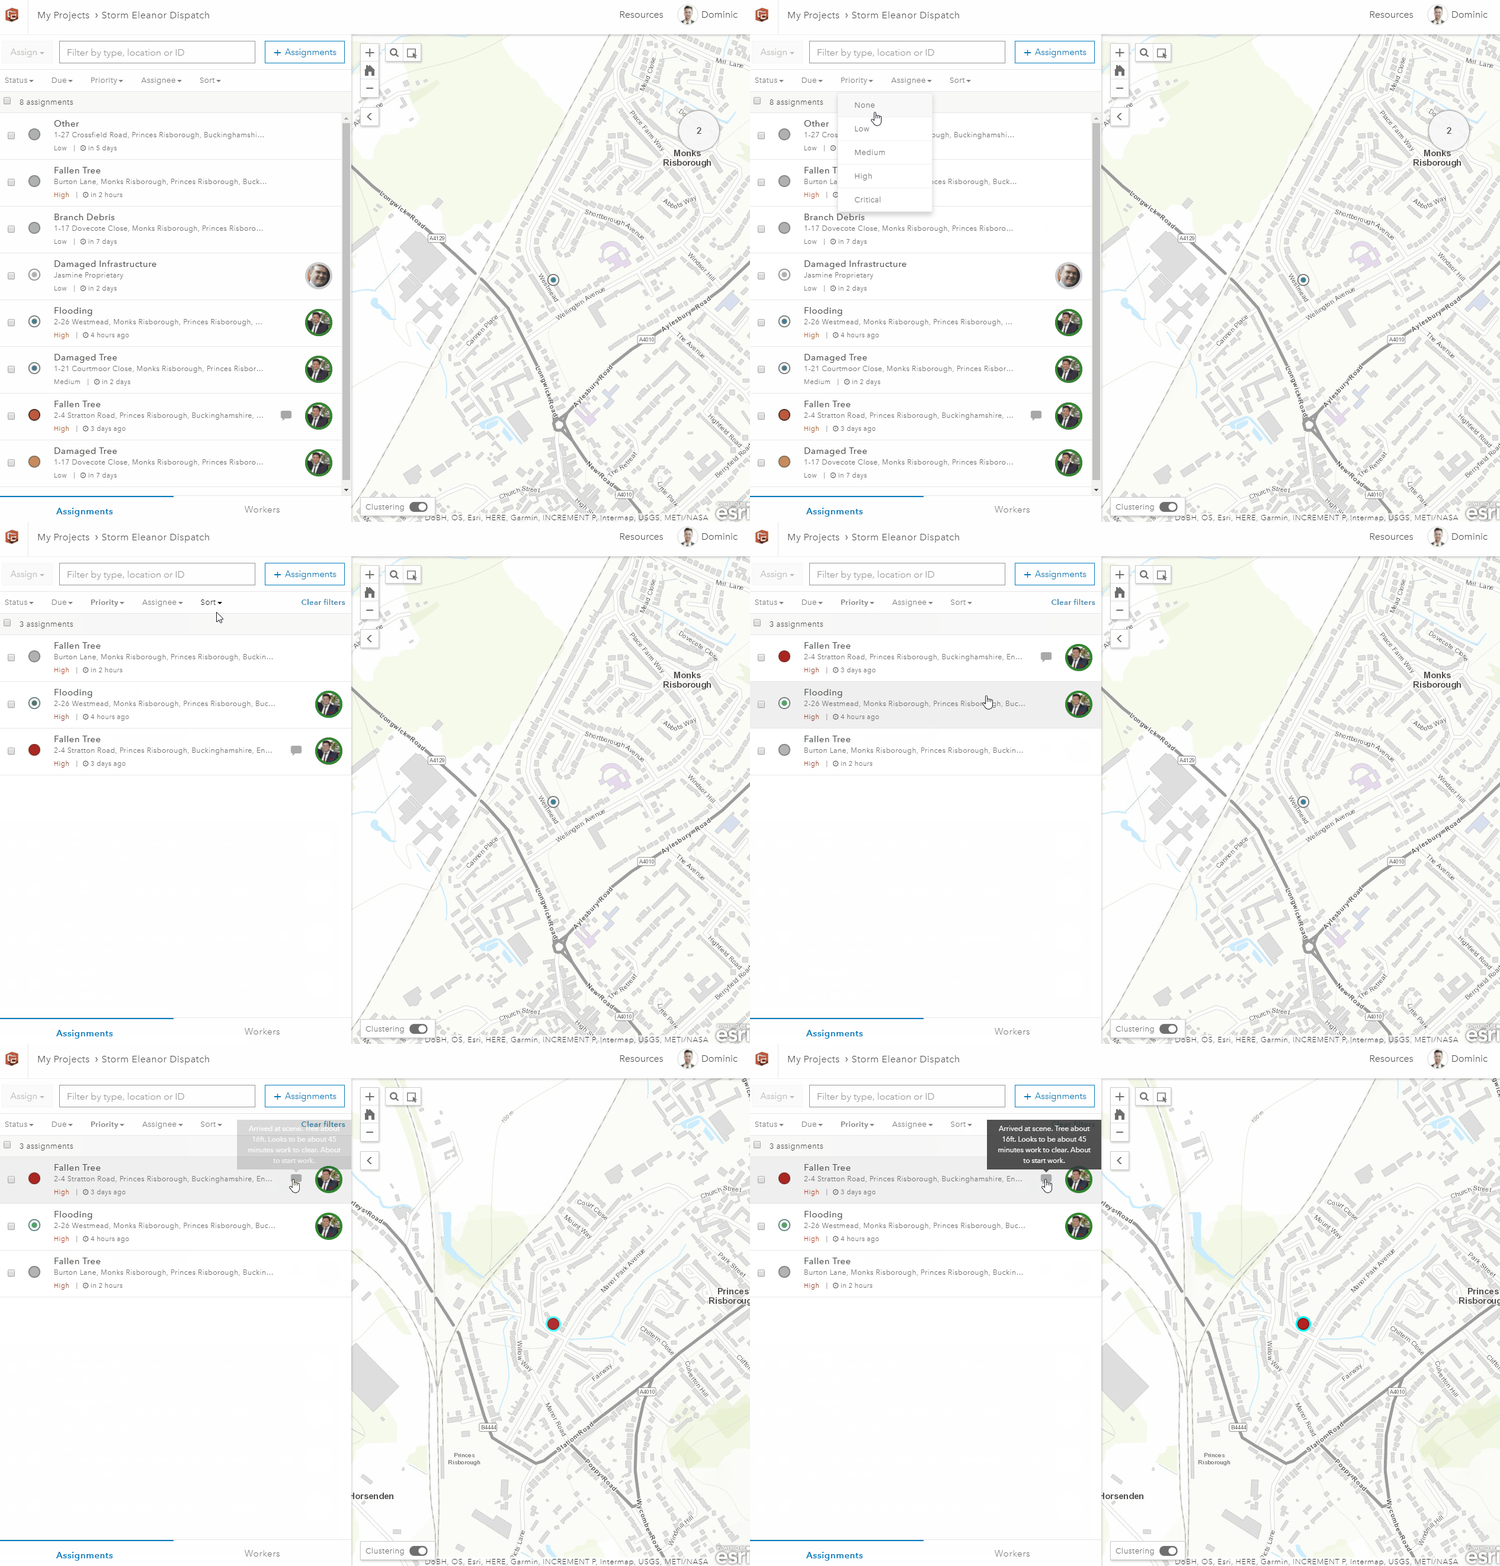
2. The latest update (17.0.1) also brought with it the ability to sort and filter the assignments list in the dispatcher view. By default, the assignments list is sorted by status – but this might not be the most useful to you. As such, it is possible to filter by a specific criteria and then sort these results, or vice versa.
Mobile Worker
1. When you’re out in the field you still need to be connected with the wider team and you can contact the dispatcher and other mobile workers through the app. Provided they have put their contact number in the project the dispatcher’s name is a link to their phone number. Other mobile workers are shown as pins on the map – green denoting that they are working, yellow on break and grey for not working. You can click their pin to see further details about them – ideal for checking if they have a tool or skill that you need for the assignment you’re working on.
2. The final handy tip is to ensure that you set your status to ‘not working’ before closing the app. This will ensure that your dispatcher has the right information on your current working state, and does not assign you projects when you are off work.
That concludes this whistle-stop tour of Workforce for ArcGIS – hopefully you’ve picked up a handful of tips and tricks. For further information be sure to check out the product page as well as this blog which covers all the latest additions in the 17.0.1 release.
![]()