You might ask yourself – but why would I want to do that? The data we use in ArcGIS Online can come from various resources. We might use layers shared by our organisation or from Living Atlas of the World, but at times we have data coming from another system. We might have found open-source data online, or we realised that there is data available in an internal system that would be interesting to map. Another reason we might want to upload Excel data into ArcGIS Online is that we might have been given additional data to a current project.
If you have Excel data and are not sure how to add it into your ArcGIS Online Content, don’t worry, because I have you covered. We will start with the foundations to prepare a good dataset and then move on to loading it.
First thing’s first…
Cleaning your data – three words nobody really likes to hear. However, this task will save us a lot of time when we map and analyse our data. Take a deep breath (and a cup of tea) and let’s get through it.
So, what do we have to watch out for? I have made this little checklist for the main points to consider.
Step 1 – Familiarise
First look through the data to get a better understanding of it; do you understand all of the data in your spreadsheet? Do you understand what the variables represent? If not, revisit the source of your data, or ask someone to clarify.
This point might seem obvious in a way, but at the same time we often just assume we know what the data is about. Then at a later point during our analysis we might realise that we have interpreted it wrong or differently. It is always better to check the data first and make sure you understand it, as well as checking licensing for the data to verify you are eligible to use it.
Step 2 – Headings
Check that your columns have meaningful headings and consider renaming where appropriate. When a spreadsheet is mapped it needs to have the column names in the first row and the data starting in the second row. This means that you need to remove any titles in your spreadsheet before uploading to ArcGIS Online. Check out this resource for some guidance on characters that should be avoided in table names.
Step 3 – Missing Values
Check if your data has missing values and think about how you will handle these. Ask yourself questions like:
- Can you find out what the missing values should be?
- How much data is missing?
- Is there enough data to produce something meaningful?
- How will you display missing data?
Step 4 – Value Type
Check each column to understand what type of data you have (integer, double, string, etc.) and is the data consistent with the type? For example, see the screenshot below. The “Orders” column contains all integer data, however, one line contains text information. Something like this could cause errors when running an analysis tool.
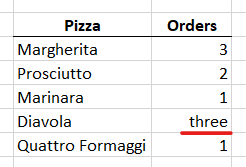
Figure 1: inconsistent data types.
Step 5 – Format
How many decimal places do you really need? Make sure data uses consistent units of measurement (if applicable) and note in your heading what type of measurement is used. If it is written next to each value, remove it – this doesn’t add anything to your data and it might get in your way when you try to run analysis on numerical data.
If your data contains date and time information have a look at this resource, which explains how the format is read in ArcGIS.
Step 6 – Location
Location might seem straight forward to some of us, however, there is still a lot to consider. Read the subsections below to get an idea of what we can upload. If you want to dive deeper into this topic, have a look at this resource.
Coordinates
The option that comes to our minds first is coordinate data. Check the geographic component in your spreadsheet. What type of coordinate system is used? Do you have to adjust it so it is readable for ArcGIS Online? Make sure you understand which column is representing longitude and which one represents latitude. If you get these mixed up, your data will be mapped in a totally different place than you expect.
Addresses
Another option on how location might be present in your spreadsheet might be through addresses. When you use addresses, ArcGIS Online will make use of the World Geocoding Service to place your address information on the map. This works well, however, you have to keep in mind that the World Geocoding Service will give you an estimate for your location on a street, it won’t necessarily put it to the exact spot in the street where it should be. If you need to regularly process address data and have access to ArcGIS Pro you can set up your own locator using suitable address data. Within ArcGIS Online you can create a locator item that references a geocode service URL, or you can create a view of the ArcGIS World Geocoding Service that targets your country or region. Have a look at this resource to see how this is done.
No Location Variable
The spreadsheet you want to add to ArcGIS Online might not contain any location-related data and that is absolutely fine. With data that does not contain location we can treat it as an additional input of information.
For example, we already have a map in ArcGIS Map Viewer. We can now add the table to this project. Next, we could for perform a Join on the data from the map and the newly added table. This allows us to use the data from the spreadsheet, that contained no location information, in our map.
Congratulations! You have made it through the worst part – preparing your data.
The main event…
Let’s now load our data in ArcGIS Online. Log in to your account, click on the Contents tab and click on the New Item button. Either drop the Excel file you want or alternatively select the file from any of the mentioned options; I most often use the Your Device option.
You can choose if you want to add your Excel file and create a hosted feature layer or table from it (you’ll still need to publish the file after adding it), or if you just want to add it as the file. Leave the default and click Next. If your Excel file has multiple pages, you can select which page you want to upload. You can upload one page per time.
Select the fields that you want to add in your hosted feature layer. Here you still have the option to alter its display name, and most importantly, double-check the type for each of your data fields. The system will automatically assign the field type based on the information it finds in each of the columns. This works most of the time, however, it’s important to double check!
Something to watch out for…
If you see a column has been assigned a different type, check in your Excel file if the data is consistent. I ran into this issue recently and was wondering why my data analysis didn’t run. It was only then when I realised that a column with integer data had a cell containing multiple values and some text. Because of this, the field value had been picked up as String instead of Integer. This caused issues when trying to run the analysis. I had to adjust the data in the spreadsheet and then upload it again. So, make sure to check your data type before uploading it and hopefully you won’t have any surprises.
Locating the location
Next up, define your location settings. From the drop-down menu you can select whether the spreadsheet contains longitude and latitude information, address information or no location data. Check that the location fields have been picked up correctly. This step is essential, because if you select it the wrong way around your data might be plotted on the other side of the world.
Finally, you will provide some information for the uploaded file. Give it a meaningful title, add tags and summary text to it and pick a folder.

Figure 2: GIF showing how to add an Excel spreadsheet to ArcGIS Online
And that’s it! You have successfully added an Excel Spreadsheet to your ArcGIS Online account.
Tips
- When using special characters, you need to save your file as Unicode text, otherwise ArcGIS Online can’t interpret it correctly.
- Avoid spaces in field names.
- When you save your spreadsheet as a .csv file the formatting and formulas will be lost – take a copy of your original Excel document.
What else is out there?
Esri Maps for Excel is an add-in for Microsoft Office. With this you get mapping capabilities from ArcGIS in Microsoft Excel, that allow you to create interactive maps in Excel which you can share to ArcGIS.
ArcGIS Notebooks can be a great addition to your ArcGIS Online account if you have data that is updated regularly or if you want to automate processes.