ArcGIS Survey123 users have had the ability to enhance their workflows through automation for some time now, using connectors available in Power Automate and Make (formally Integromat). If you wanted to configure automated post-capture workflows for your other applications, there wasn’t an out of the box offering to help you achieve this. That was until Microsoft and Esri released ArcGIS connectors for Power Automate. In this blog, we will walk through how to set up an automated workflow using the ArcGIS Connector for Power Automate. While your use cases may vary, the principles should remain the same.
Automating your workflow in Power Automate is a great way of improving user experience and boosting the efficiency of your applications by creating workflows that can send notifications when an inspection is complete or save data to an external location. If you’re unfamiliar with these offerings, this blog walks you through your various automating options.
With the release of ArcGIS Connectors for Power Automate, post-capture workflows for all ArcGIS applications both mobile and browser-based, including ArcGIS Field Maps and ArcGIS QuickCapture can now be configured with greater ease. These connectors offer a low-code environment for integrating ArcGIS processes with automation. A key benefit of using these connectors is that they remove the requirement for creator generated security tokens. These often require the user to create complex workflows and rely on them having a basic understanding of what a token is and how it is managed. These are now handled through the connector itself when you log into your ArcGIS Online account, making automated workflows easier to configure.
Premium ArcGIS Connectors for Power Automate.
Prerequisites
Before we dive into configuring our workflow there are a couple of important items we need to set up.
First of all, in order to follow along with this blog, you need to have an ArcGIS Online and a Microsoft account. You will also need to have access to the Premium Connectors from Microsoft either through purchasing the required subscription or having started a free trial. There are workflows you can create which make use of free connectors but we will not be covering them in this blog.
Secondly, the feature layer we want to use in our workflow must have the Keep track of changes to the data (add, update, delete features) setting enabled in the layers settings in ArcGIS Online. This will enable change tracking for the feature service.
The “Keep track of changes to the data” setting can be found in the layers setting page in ArcGIS Online under the Feature Layer (hosted) -> Editing section.
Now that’s sorted, we can get started on creating our workflow.
Configuring an automated workflow using the ArcGIS Premium Connector in Power Automate
In this example, we are going to use Power Automate to notify a survey manager that a new record has been collected by a field user in ArcGIS Field Maps. Our Field Maps application is designed to allow users to plot the location of road damage out in the field. The app contains a Feature Layer called Road Damage Report which allows users to plot a point, fill out attributes, attach a photo, and add comments. We are going to use Power Automate to automate the process of gathering the survey information and populate an email notifying a survey manager a point has been collected as well as include information from the feature layer in the email. This is broken down into three steps:
- Configure the Trigger for our automated workflow
- Retrieve attributes from our feature class
- Send an email notification
Step 1 – Configure the Trigger for our automated workflow
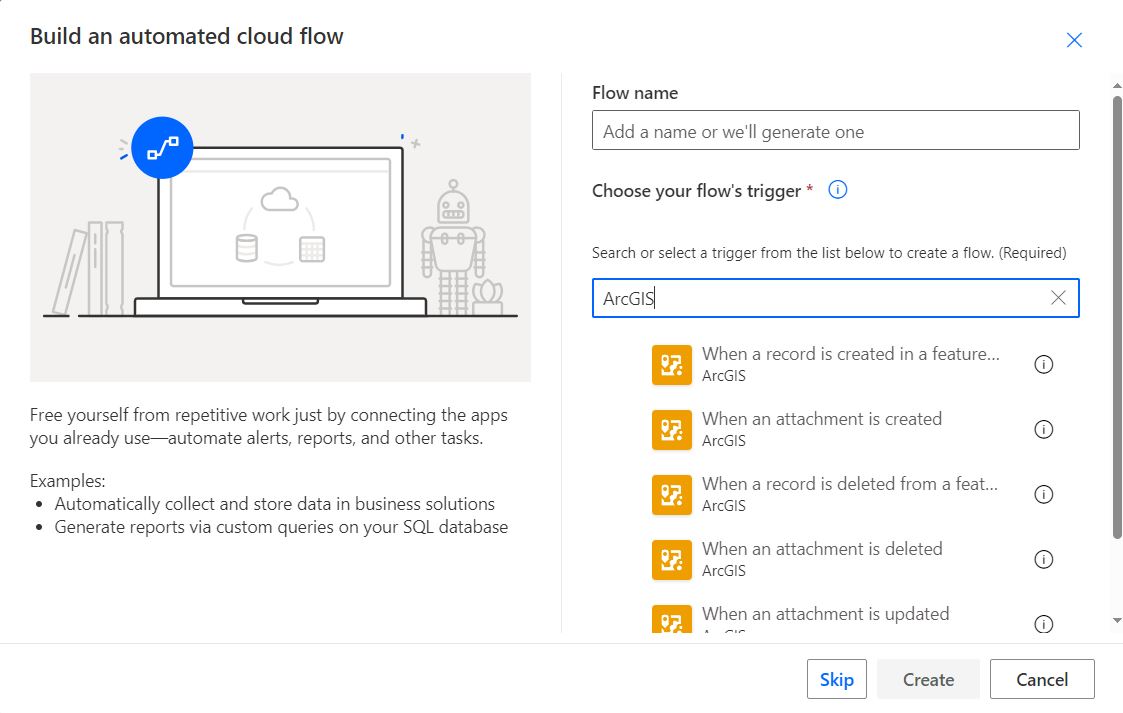
We want our workflow to run every time a new point is submitted in the field application. To do this we create an automated cloud flow and choose our trigger to be When a record is created in a feature layer.
Before you begin your workflow, you need to connect to your ArcGIS Online account through the connector. These connections can be managed in the Power Automate Connections tab.
In our example, we select a feature layer called Road Damage Report Point in the trigger. This trigger will monitor the feature layer and every time a new record is created in the layers attribute table, it will send a request to the connector in Power Automate.

Step 2 – Retrieve attributes from our feature class
The next step is to get data from our feature layer. Under the trigger, click + New step and add a control. Select the Apply to each control and add our data dynamic content from our previous step as seen below.

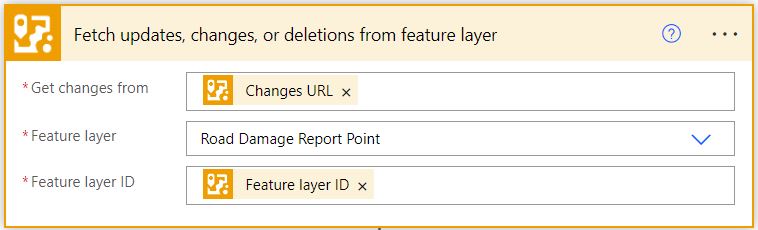
Next, under Add an action, search for the Fetch updates, changes, or deletions from feature layer action. It is important to ensure that in the Feature layer option, you select the same feature layer you used in the previous step. In the Get changes from field, add the Changes URL dynamic content. In the Feature layer ID field, add the Feature layer ID field as seen below.
At this stage, we have set up our flow to run whenever a user adds a new feature to our Road Damage Report Point layer and fetch data from that same feature layer.
Step 3 – Send an email notification
Now that we have this data, we can make use of several other Power Automate connectors to manipulate, store, or communicate this information further. Thanks to the Microsoft Outlook connectors available in Power Automate, we can send an email notification to the survey manager as soon as a new data point has been collected.
Before we add the Outlook connector, we need to add a control to our flow to ensure that all our actions for each item are executed in our array. Click on Add an action and select Control -> Apply to each. This should be nested within our first Apply to each control. From here, select items from the dynamic content to the text box when prompted. This ensures that our flow only incorporates data within this function from the item that is currently being processed.

From within the Apply to each control, add the Send an email action. In this example we use Outlook, but you can use whichever email client connector works best for you. You will need to log into an email account in order for the action to work, and then you can start to populate the email module with the email address of the recipient as well as bring in dynamic content such as the layers attributes we retrieved in the Fetch updates, changes, or deletions from feature layer module.
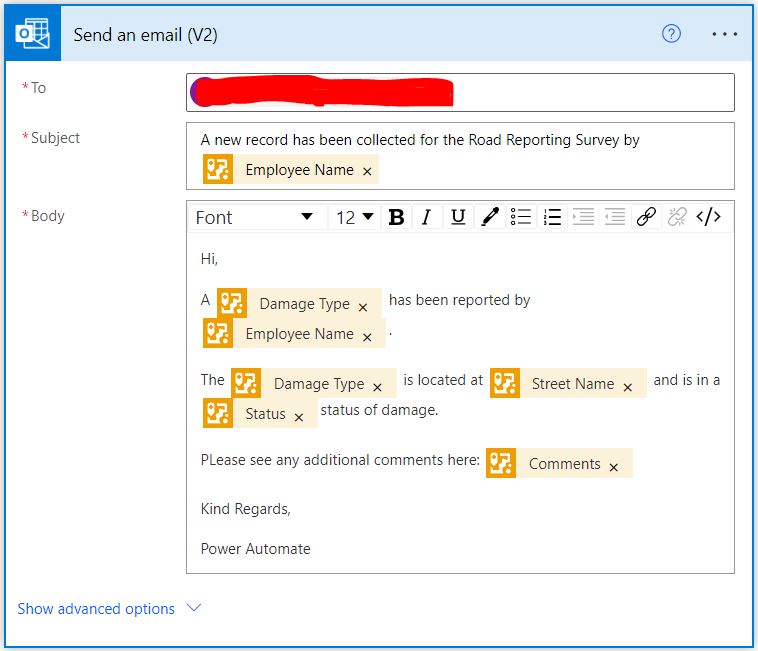
Making use of dynamic content to populate the email module. You can even pull email addresses into the recipient part of the flow if your survey collects this information.
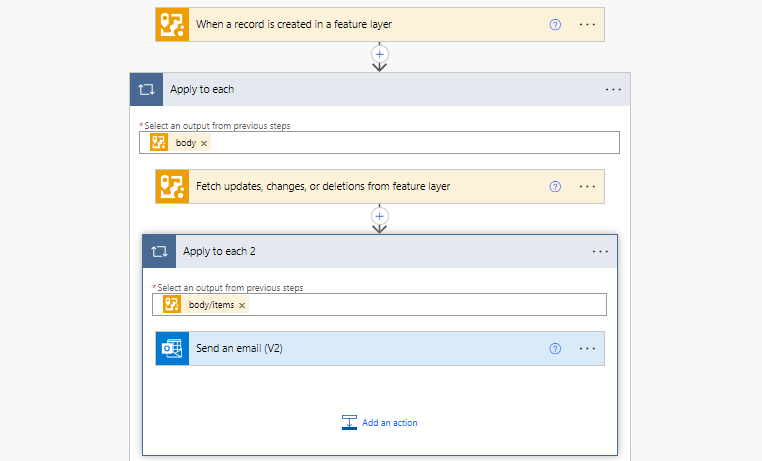
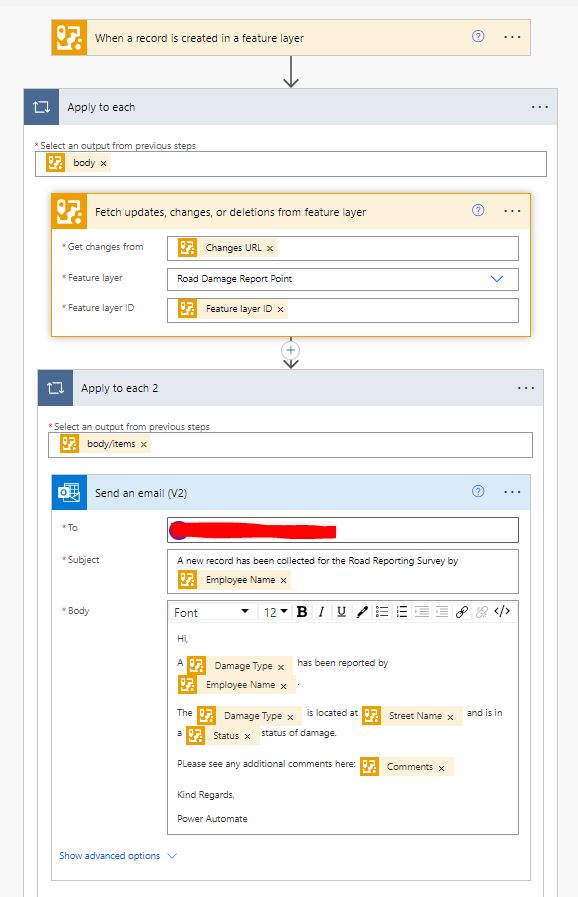
And that’s it! We set a trigger to begin our flow whenever a new point is collected in our feature layer, we brought in attribute information from the layer and then sent an email containing this information to a survey manager informing them of the changes. If you’ve been following along, you can save your flow and begin testing. Your workflow should look something like this:
 This is just one example of the many things you can do with automated workflows using the new ArcGIS Connector in Power Automate. If you are keen to get started with automating your workflows, and already have a Microsoft subscription, you can sign up to Power Automate for free so why not give it a go?