ArcGIS Experience Builder has been floating around as a product for a while now, with its long list of amazing features and the endless possibilities they create. It’s a wonderful product when you wrap your head around it, but perhaps that’s also what makes it so daunting. Many directions to go in, but where to start? Well, I’m here to break down that barrier and hopefully encourage you to dip your toe into the exciting world of creating an experience.
AND… if you’ve really caught the Experience Builder bug, you can watch our recent webinar here for an extended version of all the below topics.
What is it and where does it live?
The first thing to address is, what actually is Experience Builder? If you’ve seen example ‘experiences’ (the term used for Experience Builder outputs), you’ll probably note they look a lot like other parts of the ArcGIS System… Is it a Storymap? Or even a Hub page? Maybe an embedded Ops Dashboard or Web App Builder? Well the short answer is, Experience Builder takes all those amazing features and puts them into a single location. The intention is not to replace these other products, but provide opportunities for users to combine the best features from across the ArcGIS System and create an experience with them.

The benefit of designing an experience that might act like another Esri product, is the ability to completely control each element on your page in terms of size, position and functionality. Experience Builder is built with Javascript 4.x., which means full flexibility on resizing elements, all that drag and drop goodness and the ability to use maps/apps built from the new Map Viewer (also built with JavaScript 4.x).
drag and drop functionality
The final introductory point I want to mention is surrounding the commonly asked question ‘will this replace Web App Builder?’. No it won’t. The two products will continue to co-exist, however with the previously mentioned Javascript 4.x build, this will make Experience Builder a preferred option as Esri technology evolves and moves towards JavaScript 4.x (i.e. the new map viewer).
So where to start?
Of course, you could start from scratch. You can build your experience from a blank canvas and design it exactly how you like it, but I imagine you wouldn’t be reading this blog if you were that kind of person. So for me, the best place to start is templates. With over 20 templates to pick and choose from, you can select a suitable Esri template as a place to start, then begin by editing the already pre-configured experience. This approach makes it a lot easier to let Esri do the heavy lifting on the page structure and allow you to focus all your creative energy on the stuff that matters, like widgets and colours. You can also create, share and use templates across ArcGIS Online, which is handy for others in your organisation when they want to design an experience with a consistent branding. Even something as simple as adding in your company’s logo and tweaking the colours can make the app feel like your own.
Using an Esri UK template
Widgets
At the heart of Experience Builder are widgets. They are fundamental to making your experience come alive with functionality and I want to give you a quick overview of how they’re configured. All widgets are split into two categories, Basic and Layout widgets. Basic widgets resemble those we’ve seen on Web AppBuilder, the widgets that create certain triggers such as exporting your map or filtering the data. Layout triggers have a different purpose and are there to help structure your page. They allow you to create things like panels or columns/rows for your basic widgets to sit on top of.
Once you’ve selected your widget, explore the configuration settings which present you with three configuration elements:
- Content is what data source your widget will look to interact with.
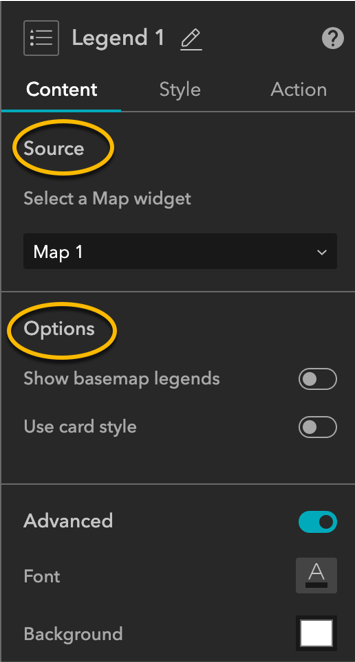
Content
- Style is all about the aesthetic, selecting colours, style and even animation options.

Style
- Action is unsurprisingly, the ‘what is going to happen’ section of a widget. You can define the trigger of your widget i.e. zoom into this extent or export as CSV.
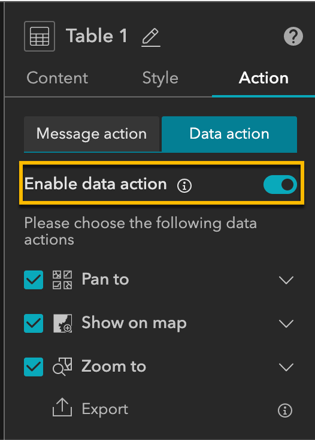
Action
Theme
Themes are a mechanism we’re starting to see across the ArcGIS system. They meet a growing demand for users to make their apps look exactly how they want. You might have seen how ArcGIS Storymaps takes theme customisation to a new level, That’s why the theme in Experience Builder allows you to customise the fonts, font sizes and colours of your experience, then share this far and wide across your organisation.
Publishing
Once you’re happy with your created experience, sharing it works in a similar model to other parts of the ArcGIS system, such as in ArcGIS Storymaps. You design your experience in the draft status, then once it’s ready you Publish. You can then share this either publicly or within your organisation. At this point, you can continue to make edits in a sandbox type environment without the risk of editing the live version. Once you are happy with your changes, you can Publish the changes to the live version. The url for the experience stays the same across any updates.
For me, these are the fundamental ‘getting started’ elements that I believe will give you a solid foundation to explore more of Experience Builder’s wonderful features. Starting with a template and a basic understanding of widgets will allow you to explore the builder with confidence, hopefully designing your ideal experience in the process. I hope you’ve found it useful!