Jupyter Notebook seems to be the latest craze in Python developer environments and it’s changed the way I work with Python in ArcGIS. It’s now the recommended environment if you wish to work with the ArcGIS API for Python. If you want to find out the types of notebook that are available in ArcGIS then read on….
What is a Jupyter Notebook?
Jupyter Notebook is a web-based interactive development environment (IDE) which is available for you when the ArcGIS API for Python is installed. It is a fully functioning IDE which means you can type and run your Python code in a cell-based environment.
The Jupyter Notebook doesn’t just work with Python and this is reflected in its name as, according to its co-founder Fernando Perez, it supports the languages Julia (Ju), Python (Pyt) and R.
Some of the reasons why Jupyter Notebook has become so popular are:
Code cells
As you write code in cells you have the advantage of being able to run individual cells of code over and over again without having to execute the complete script.
Markdown
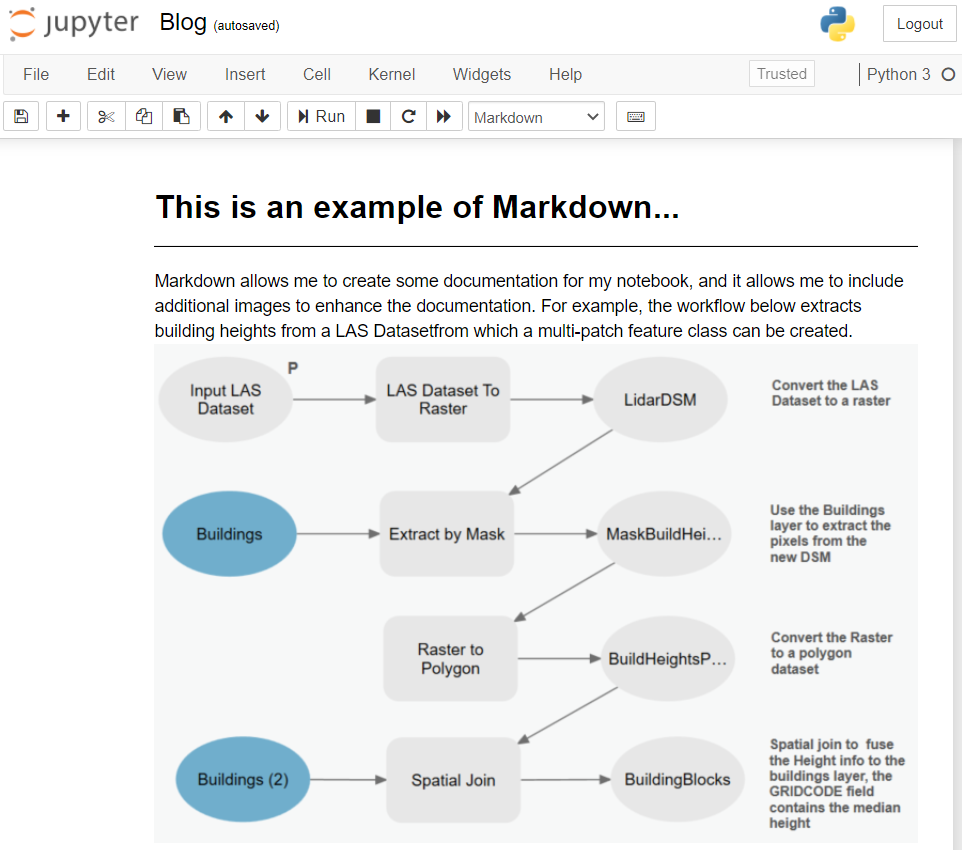
Notebooks can display not just Python code and its output but also markdown. Markdown is a lightweight markup language which means your Notebooks can be fully documented with different types of formatting and further enhanced with additional images, for example a ModelBuilder workflow can be used to explain what your code does in the script:
Visualise resources
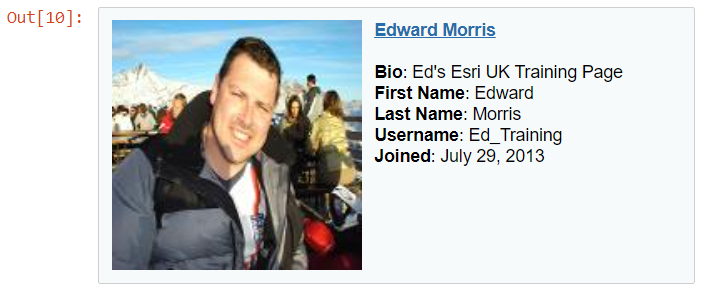
Jupyter Notebook make it easy to visualise resources which have a rich representation, for example pandas data frames, matplotlib charts, maps and scenes, and users that might exist within your portal:
So.. what’s the difference between a Jupyter Notebook and ArcGIS Notebook?
Quite simply ArcGIS Notebooks are based upon the Jupyter Notebook. Esri have taken all of the great things that the Jupyter Notebook provides and embedded it inside of ArcGIS.
ArcGIS Notebooks are available with:
- ArcGIS Pro (2.5 and above)
- ArcGIS Enterprise (10.7 and above)
- ArcGIS Online
At last! We no longer have to use the Python window inside of ArcGIS Pro to write Python code in the application…
How do I get started with ArcGIS Notebooks?
It depends upon which application / environment you want to work with.
Getting access to an ArcGIS Notebook is actually pretty easy.
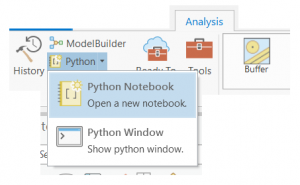
In ArcGIS Pro all you have to do is click the Analysis tab, locate the Geoprocessing pane and choose Python Notebook from the Python drop down.
This will open a new Notebook view and add an entry into the Catalog pane.
You can create and edit ArcGIS Notebooks in your ArcGIS Online portal if the create and edit notebooks permission has been set within a custom role assigned to your organisational account. With this enabled you will see a new Notebook tab appear – from which you can then get to work with the ArcGIS API for Python in your online ArcGIS Notebooks.

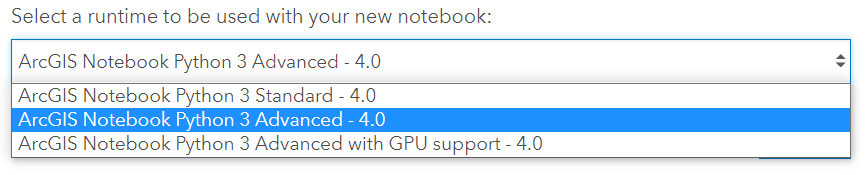
If you wish to use ArcPy or perform some advanced deep learning workflows then an additional permission will need to be set by your administrator so you can access a more advanced runtime, but please bear in mind this will start to cost credits!
ArcGIS Notebooks are also available within your ArcGIS Enterprise portal and are powered through an ArcGIS Notebook Server. You can now script portal administration tasks as well as create and run data science models
 A number of Samples are supplied to help you get going. They are available through the Enterprise and Online Notebooks.
Can I use ArcPy in the ArcGIS Notebooks?
The answer is YES!! And the great thing about this is that ArcPy is available in ALL ArcGIS Notebook implementations – including ArcGIS Online. This means that your data analysis and processing workflows can be combined into one Notebook.
For example you can search for a particular geoprocessing package which is stored in your portal and that can be downloaded into an accessible location on your desktop machine and then unpack that package to get access to its contents, all in a single Notebook file.
Remember that if you wish to use ArcPy in the ArcGIS Online implementation of ArcGIS Notebooks then you will need to make sure that your administrator has provided access to the Advanced runtime for the role associated with your account.
You’ve whetted my appetite… how do I get started?
It’s pretty straight forward… The first thing you will need to do is to learn Python and then get a good understanding for the ArcGIS API for Python or ArcPy. We have some great courses which will help you get up and running and become more than proficient in the language and the site packages.
Just search for “Python” in the Esri UK Learning Services Catalogue, here.
If you can’t wait then you might want to try out the ArcGIS API for Python’s equivalent of “Hello World!” and create a really basic map…
1) Create a new notebook.
2) Create a new cell.
3) Write the following code:
from arcgis.gis import GIS

gis = GIS()

myMap = gis.map("Stanley Park, Liverpool")

myMap.basemap = 'satellite'

myMap.zoom = 15

myMap
4) Run the code in the cell.
All things being equal, the following map will hopefully be displayed!

Congratulations – you have just dipped your toe into the world of ArcGIS Notebooks.
And there you have it! In conclusion ArcGIS Notebooks provides many benefits; from streamlining your processes and workflows, collaboration is made easier. If you haven’t tried them so far then give them a spin!