Both ArcGIS Online and ArcGIS Enterprise offer two map viewers for viewing, using and creating maps.
The Map Viewer is a modern map-making tool that features fast and responsive mapping and real-time updates to the map as you work. Map Viewer offers a variety of visualisation tools to help you uncover patterns and answer questions with your data.
Map Viewer Classic is the predecessor of Map Viewer. Because it is built on legacy technology, it does not support the new capabilities available in Map Viewer.
This blog aims to help ArcGIS Enterprise users move from Map Viewer Classic to Map Viewer providing information for administrators, content creators and map users. If you are an ArcGIS Online user skip ahead to the section on interface changes and you’ll still find some useful tips in the rest of the blog.
Administration
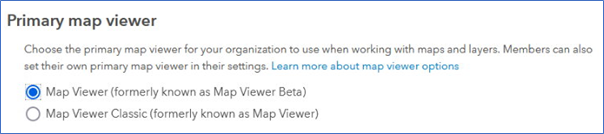
Default administrators and those with the appropriate privileges can choose which map viewer will be the default for the Enterprise portal.
It is easy to configure the Primary map viewer setting by following these steps:
- Verify that you are signed into the Enterprise portal as an administrator.
- At the top of the site click Organization and then click the Settings.
- Click Map on the left side of the page.
- Select Map Viewer as the primary map viewer.
 Note: Individual portal members can set a different primary map viewer from their user settings. Both Map Viewer and Map Viewer Classic are available from the app launcher regardless of the primary map viewer specified.
Interface changes
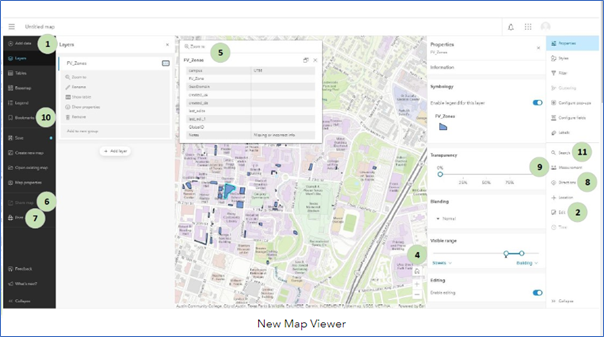
There are several interface changes that have been highlighted in the graphics below:
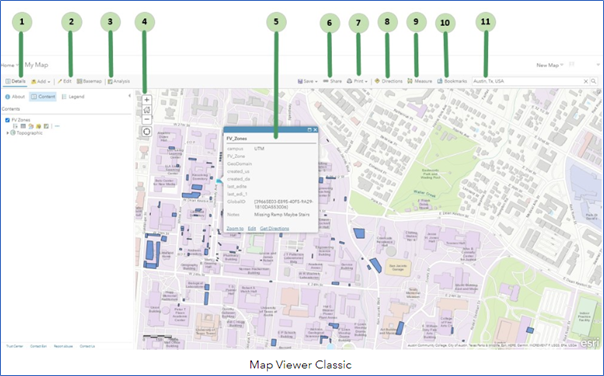
Details (1)
Includes options to see information about the map, the map contents and a legend. In the new Map Viewer these options are split across various locations on the right-hand side of Map Viewer.
- About displays descriptive information about the map, such as a summary, the map owner, the last modification date, user ratings and a link to more detailed information.
- Content displays a list of the layers in the map. Click the name of the group layer to see the individual layers in the group. Check and Uncheck the box to the right of the name to turn on and off (hide) the layer. In the new map viewer, you click and unclick the eye icon. Click the arrow to the right of the layer name and click Show Item Details or Description to open a page with detailed information about the layer.
- Legend displays a legend for layers in the map. You will not see a legend for basemaps, layers that are not accessible externally or layers in which the map author has hidden the legend.
Edit (2)
Available when viewing a map with an editable feature layer. Use the Edit button to add, change or remove the features on the map.
Analysis (3)
Includes tools to find patterns, understand relationships and make decisions about the data in your map. The Analysis button appears when you are signed in with an organisational account that has privileges to perform analysis. In the new Map Viewer there is no Analysis tab (at ArcGIS Enterprise 10.9.1 and before).
Navigate (4)
Used to navigate around the map. The following are navigation tools:
- The plus sign is used to zoom in and the minus sign to zoom out. The mouse wheel or the arrow keys on the keyboard can also be used to zoom in and out.
- Home is used for the maps default extent. The default extent can also be found by browsing bookmarks.
- Pan using the mouse and wheel button or the arrow keys on your keyboard.
- Find my location is used to find your current location. In the new Map Viewer click Location on the right-hand side to find current location.
Pop-ups (5)
The attributes (including images or links) associated with each individual feature in the map can be viewed in the pop-up displayed when feature is selected.
Share (6)
Allows for sharing a map to social networking sites, through email, embedding maps in a website or blog and creating apps with maps. You can only share a map if you have the necessary privileges. In the new Map Viewer, the sharing icon only changes the sharing level of the web map and map content.
Print (7)
Used to print the map and its legend. Once the print page has finished loading, you can use your browser’s print option to print a complete and well-formatted map.
Directions (8)
Used to get a set of turn-by-turn driving and walking directions. Only available in an organisational account that includes privileges to use network analysis.
Measure (9)
Used to measure the area of a polygon or the length of a line or to view the coordinates of a point.
Bookmarks (10)
Used to access a set of predefined locations on the map. If you are a map author, you can create bookmarks.
Search (11)
Used to find locations on the map, such as addresses, places and points of interest.
Contextual Aspect
The Map Viewer includes two toolbars – the Contents (dark) toolbar and the Settings (light) toolbar. Use the Contents toolbar to manage and view the map contents and work with the map. Use the Settings toolbar to access options for configuring and interacting with map layers and other map components.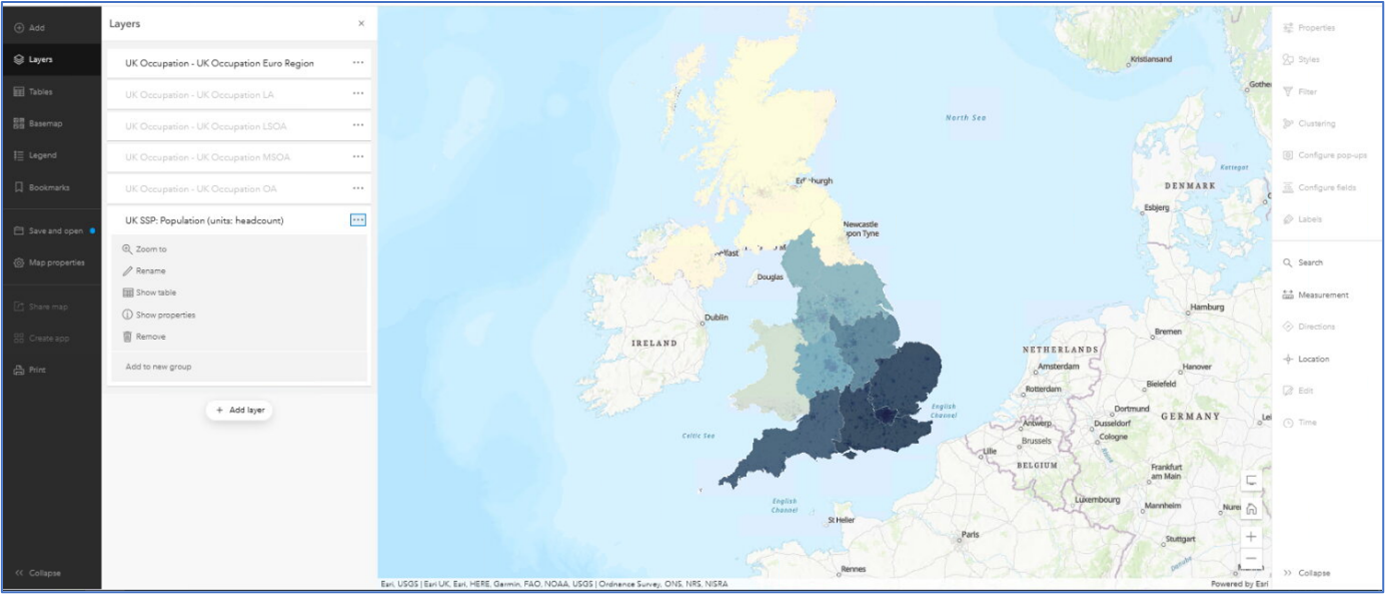
Contents Toolbar
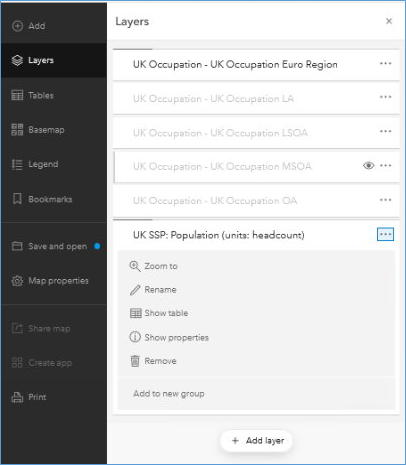
Manage and view key components of the map using the Contents (dark) toolbar buttons. For example, you can change the basemap and add layers. Click the Layers button to see what layers are in the map.
Layers in the map are drawn in the same order in which they appear in the Layers pane. You can organise layers to draw in any order and hide or show layers by clicking the ‘eye’ Visibility button, respectively, individual layers. You can also click Options (three dots), to expand the list of options for the layer and view the layer’s properties.
Settings Toolbar
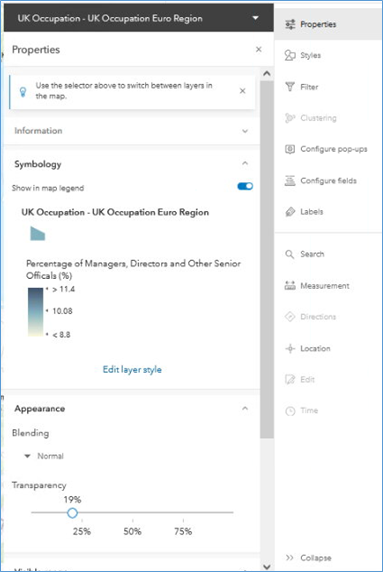
The Settings (light) toolbar includes options for working with individual layers in the map, as well as options for working with the map itself. Select a layer in the map to access the layer options on the toolbar. You can use the selector at the top of the active pane to quickly navigate between layers.
Layer properties are easy to find at the top of the Settings toolbar. The layer options displayed depend on the type of layer selected and, in some cases, the data contained in the layer. For example, the Clustering button is only displayed when a feature layer containing point features is selected.
Use the Settings toolbar to configure pop-ups, filters, clustering, labels, and more. Your changes are instantly visible on the map, allowing you to experiment and explore various options. Click the Styles button to explore smart mapping styles exclusive to Map Viewer, such as dot density, as well as many other styles. You can try different symbols and colour ramps for features and imagery in the map.
More information can be found in the help documentation.
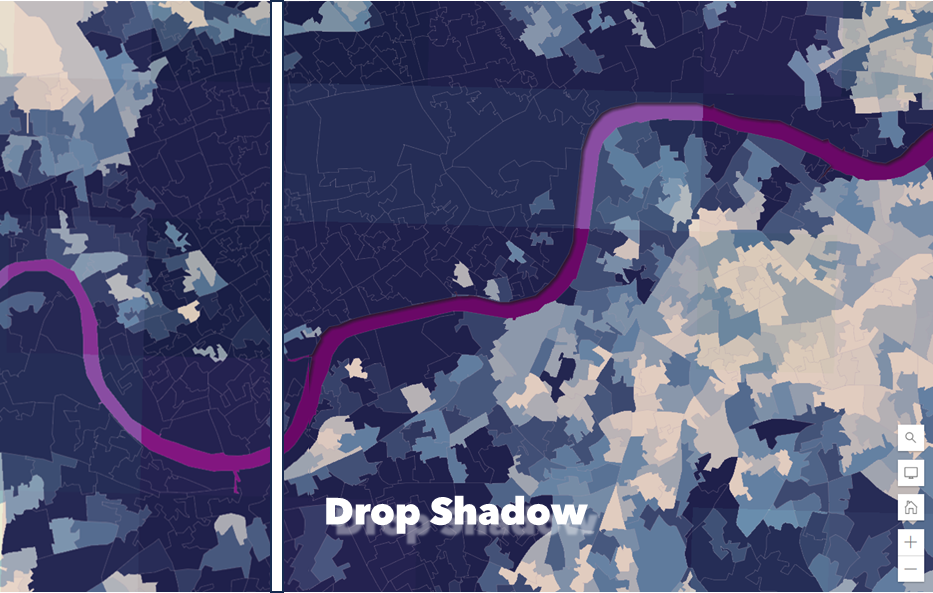
Visual Effects
To create a unique and eye-catching map in Map Viewer, you can apply effects to layers in the map. For example, you can apply a bloom effect to a layer showing volcanic eruptions or make the labels on a map stand out by applying a drop shadow effect to the basemap reference layer. Experiment with the available effects to achieve the look and message you want. You can quickly apply one or more effects without changing the default settings, or you can customise the effects to suit your needs.
Note that the visual effects are available in ArcGIS Enterprise v11.0 and later.
Example effect – Drop Shadow
Forward and backward Compatibility
To create production-ready web maps with new features, you can open maps created in Map Viewer in Map Viewer Classic and vice versa. This provides flexibility in how you author your maps. There are differences in functionality between the two map viewers and it is recommended that you ensure that new functionality, such as dot density maps, can be viewed.
Both Map Viewer Classic and Map Viewer provide notifications of these circumstances. In most cases, the unsupported content doesn’t appear. It is recommended that you use the Save as option when saving web maps that are authored in both Map Viewer Classic and Map Viewer. To help you determine which map viewer to use, see the FAQ.
For more specific information about what is supported in each map viewer, see the compatibility here.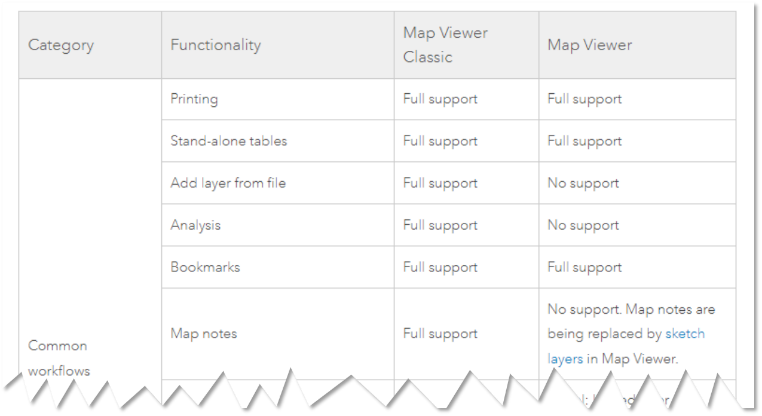
Summary
Both Map Viewer and Map Viewer Classic offer map makers lots of great capabilities and tools to build inspiring and visually fantastic map resources. However, Map Viewer has much to offer with great new functionality.
Finally, here are some resources to help determine what tools and capabilities are available in your version or ArcGIS Enterprise:
- What’s new in ArcGIS Enterprise 11.1 – Mapping and visualisation.
- What’s new in ArcGIS Enterprise 11.0 – Mapping and visualisation.
- What’s new in ArcGIS Enterprise 10.9.1 – Mapping and visualisation.