The Vehicle Routing Problem, also known as the Travelling Salesman Problem, is a mathematical problem and set of equations for working out route optimisation.
The ArcGIS Pro 2.6 update has brought us the Vehicle Routing geoprocessing tools, ready to use in a brand new and shiny interface. This blog will introduce you to the Vehicle Routing problem through a simple example that you can follow along with.
Before we dive into the methodology, I shall explain why we use these tools. Vehicle Routing optimisation is important for any transport based industry that involves deliveries, pickups, services or inspections. Important costs such as time, money and emissions can be saved by calculating the most efficient route.
What you will need:
- ArcGIS Pro 2.6 (or later)
- ArcGIS Network Analyst extension
- A Network (optional) – Vehicle Routing Problems require a network to run. By default ArcGIS Pro uses a credits based network. If you have suitable network data, you can setup a network which does not consume credits.
The Scenario
Let’s imagine a hypothetical scenario in which we manage a bakery called Rise Patisserie, an up-and-coming maker of delicious treats. Rise delivers puddings around the Reading area with a next-day delivery service, aiming to deliver before midday. Today we received 10 orders which we will deliver before midday tomorrow. We are conducting the analysis now, so we can give the directions to the delivery driver before they leave tomorrow morning.
By driving the optimum route, identified by this analysis, we hope to save on distance-based-costs, such as fuel and emissions, as well as delivering on time and maintaining good customer service.
Preparation and key definitions
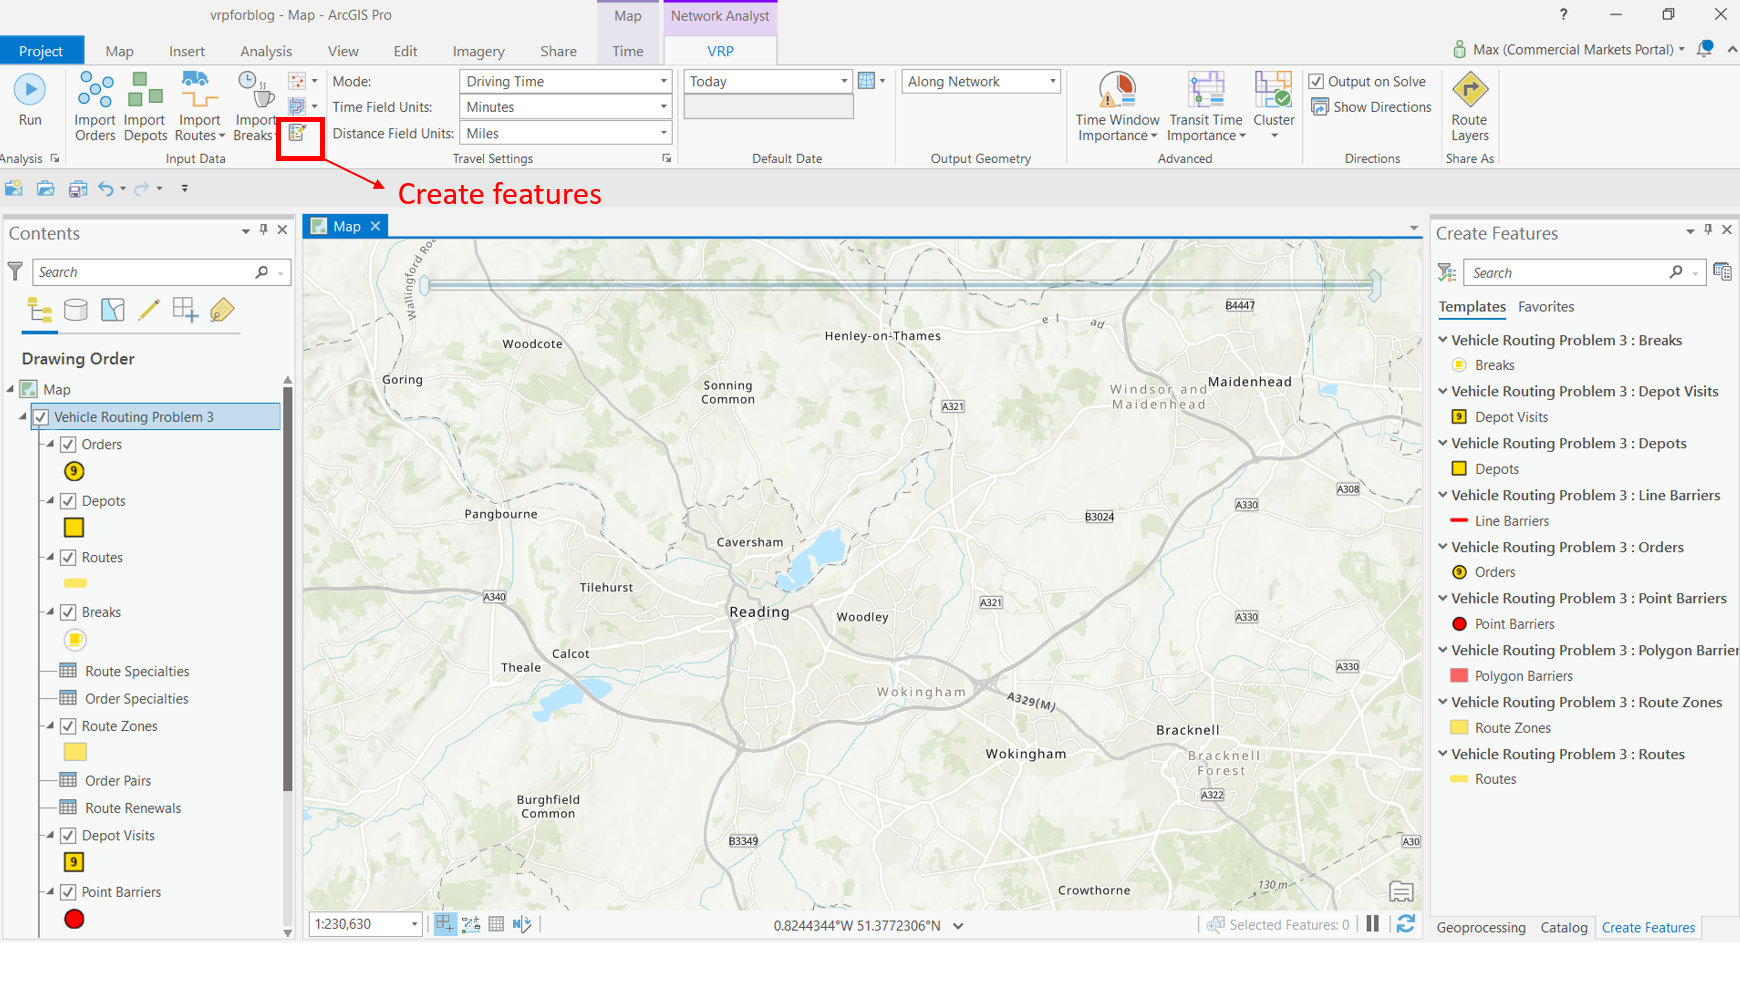
In a new ArcGIS Pro project open the Analysis tab and, within the Workflow section, click Network Analysis. A drop down appears; click on Vehicle Routing Problem. This will run a geoprocessing tool automatically, called Make Vehicle Routing Problem Analysis Layer, and a set of layers will appear in the contents pane. Additionally, a purple tab will appear called Network Analyst VRP.
Click on the Network Analyst VRP tab. Within the Input Data section we can Import Orders, Import Depots, Import Routes, Import Breaks, Import Point Barriers, Import Route Zones and Create Features. These options will allow us to customise our scenario. The import options allow us to bring in already existing features you have created into this ArcGIS Pro project, such as a point dataset of delivery addresses. Alternatively, the Create Features option allows us to make all the parts for our Vehicle Routing Problem without needing any pre-existing data.
In a simple Vehicle Routing Problem, we need a depot, some orders and a route. What are they?
Depot
A depot is a location that a vehicle departs from at the beginning of the workday and returns to at the end of the workday. A depot can also act as a renewal location, whereby the vehicle can unload or reload and continue performing deliveries and pickups.
Order
An order can represent the destination of a specific delivery, pickup or some type of service or inspection. In our scenario, for us it represents the location each of the pudding deliveries.
Route
A route specifies vehicle and driver characteristics. When the analysis has been run, it also represents the path between depots and orders for that vehicle.
How to make your first Vehicle Routing Problem
In the Network Analyst VRP Create Features pane, select Depot to create the depot location. I chose a location in an industrial estate to the northwest of Reading. In the Contents pane, make sure you have the Vehicle Routing Problem group expanded. Right-click on Depots and click on Attribute Table. This table contains the information about your depot. Change the Name of the depot to ‘Bakery’.

Next, we need the addresses of the orders so we know where to deliver to. Just like the depots, in the Network Analyst VRP Create Features pane select Orders to create the order locations. I placed ten order locations around Reading. After this, open up the attribute table for the orders and name each order (to keep things simple, name them Order1-10).

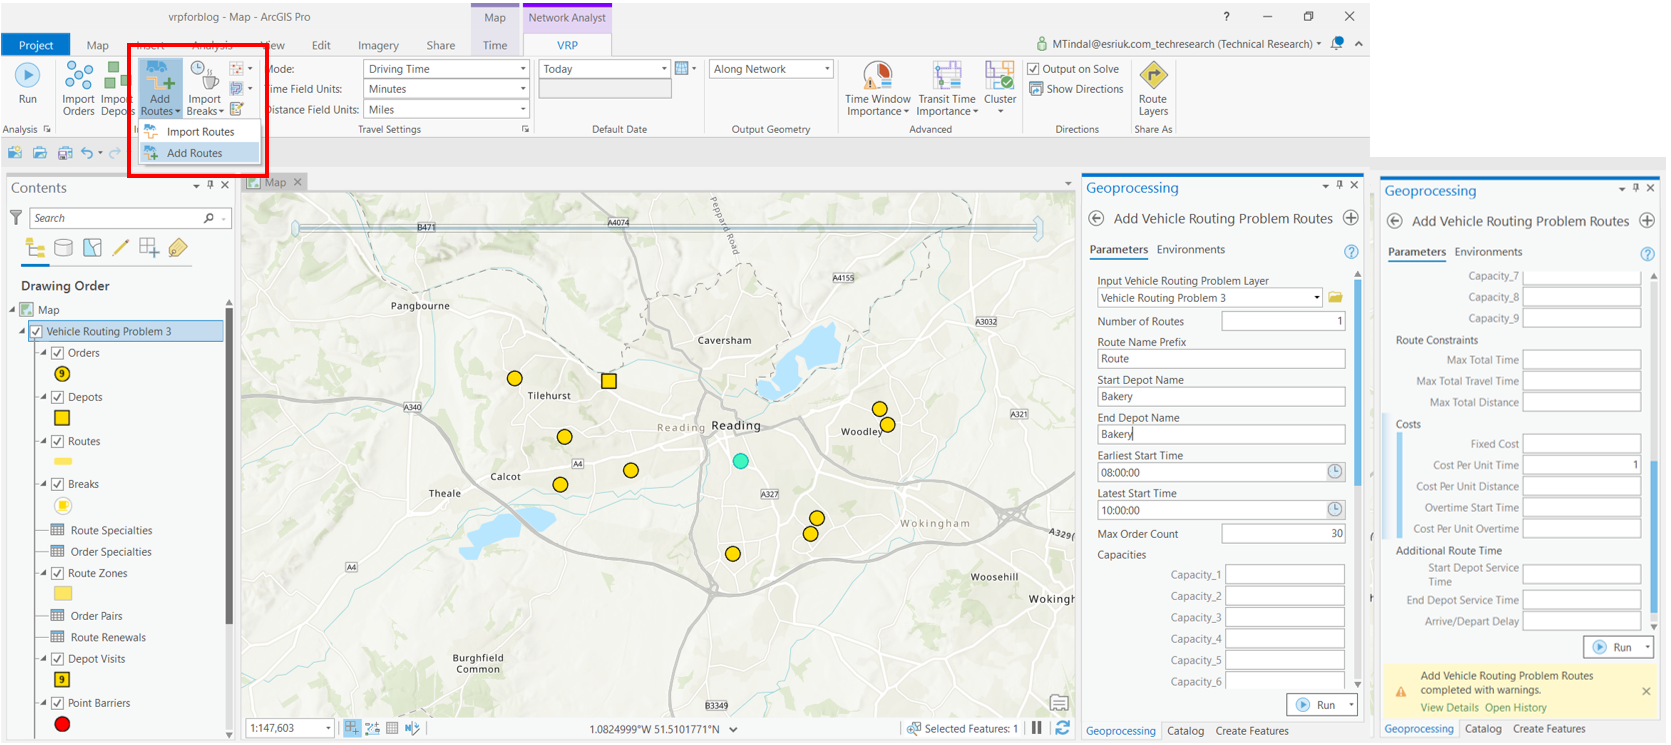
Finally, we need to calculate our route. In the Network Analyst VRP tab, click Import Routes and select Add Routes. A geoprocessing pane will open up called Add Vehicle Routing Problem Routes. In this scenario, we will just use one route – input 1 in the Number of Routes box. Name your route ‘Route1’. For Start Depot Name and End Depot Name input ‘Bakery’, the name of your Depot. In the Costs section, set Cost Per Unit Time to 1. If you would like, you can adjust the Earliest and Latest Start Times. In the Add Vehicle Routing Problem Routes geoprocessing pane, press Run to add your routes to your Vehicle Routing Problem.
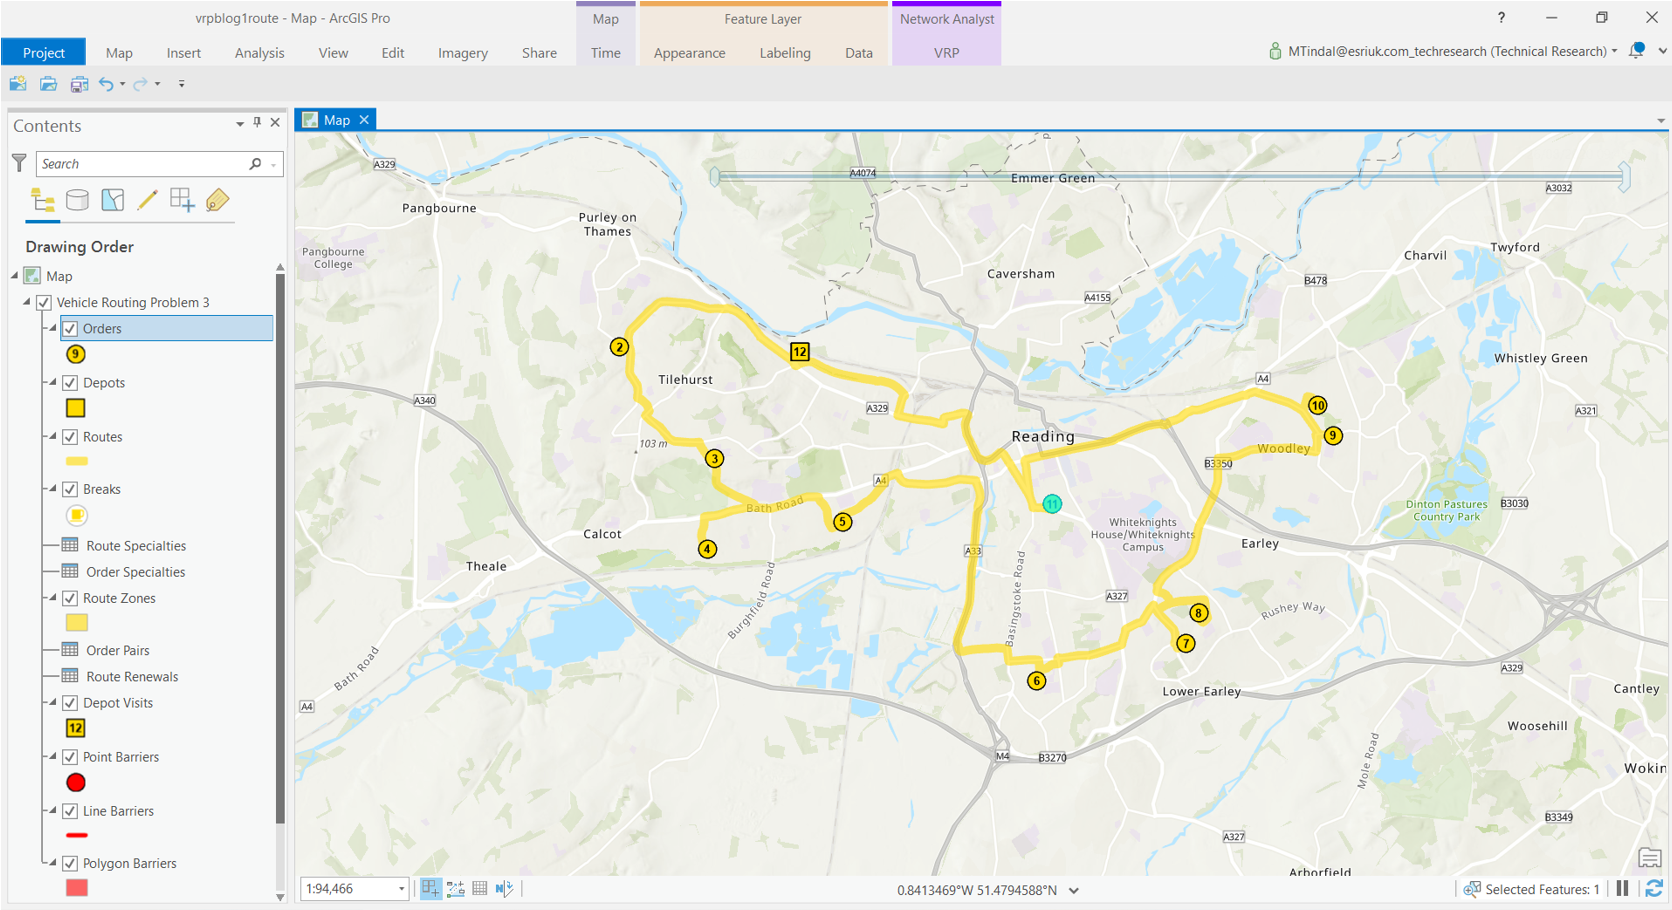
You have now created your depot, your orders and added the route. We can run the Vehicle Routing Problem by clicking Run in the Analysis section of the Network Analyst VRP tab. After a little ArcGIS Pro thinking, you will see a route output, linking all the orders to the depot. This is the most efficient route to deliver to the locations you selected.
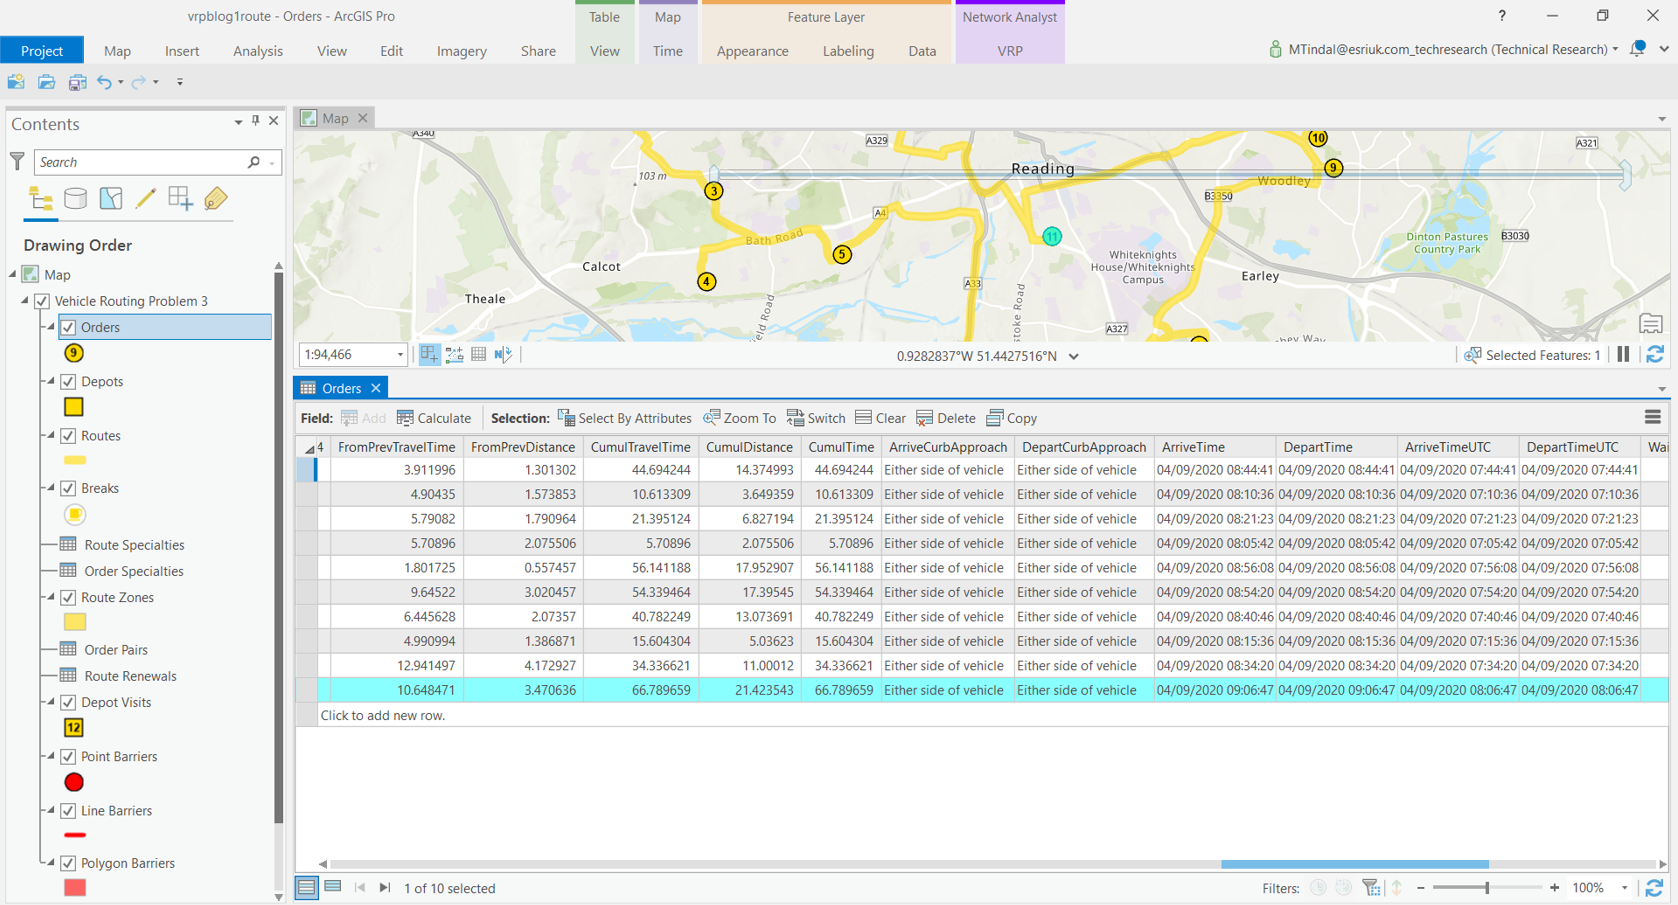
Open up the Orders Attribute Table and scroll across to find further information regarding the time taken and distance driven to deliver the baked goods. We find it took 66 minutes for our vehicle to deliver to the 10 addresses.
You can find the delivery directions by looking in the Directions section of the Network Analyst VRP tab. Click Show Directions where step by step directions have been generated. This can be printed or use the Share as section to share the directions ready to be used inside our ArcGIS Navigator app.
Remember to save the project.
Further steps
At Rise Patisserie, we have access to two vehicles, so I wanted to see how much faster two vehicles would be at delivering to the 10 addresses between them. To do this, I clicked on the Orders in the contents pane, and selected Data, Export Features. This allowed me to save the Order locations. I did the same process to save the Depot.
I then created another Vehicle Routing Problem by clicking on the Vehicle Routing Problem option in the Network Analyst tab. This will run the geoprocessing tool called Make Vehicle Routing Problem Analysis Layer again and a second set of layers will appear in the contents pane.
The Import Orders and Import Depots options can be used to reload our Depot and Order locations. I then created the routes in the same way as last time, but this time with a 2 in the Number of Routes box. I ran the Vehicle Routing Problem and this time there are two routes meeting the depots and orders.

We can open up the Orders attribute table and see that in my scenario the two vehicles took 47 minutes to deliver all the baked goods. We have shaved 19 minutes of the previous 66 minute total delivery time. This information can be used for Rise Patisserie to make an informed decision about whether the cost of two vehicles is worthwhile, compared to just using one!
The scenario here has given you a good grasp of the basics of vehicle routing and means you can now start to setup more complicated situations! Actual cost calculations, vehicle characteristics, time windows and more orders are just a few possibilities you could consider… good luck!