Hosted feature layer views are a powerful way to manage and share data in ArcGIS Online. They let you create tailored perspectives on a single dataset – whether that means applying filters, adjusting editor settings, or limiting access to sensitive fields. Using hosted feature layer views (or simply view layers or views) effectively helps streamline workflows, improve data security, and enhance user experience.
In this blog, I’ll share why view layers are worth using, how to make them work for you, and what I’ve learned along the way – helping you get the most from your data.
Why use hosted feature layer views?
The main benefit to using a view layer is the flexibility you get without duplicating data. Instead of publishing multiple layers, you can create view layers that reference the same source layer. This means:
- Consistent data – edits to the source layer automatically appear in the view.
- Custom configurations apply different filters to control visible fields or restrict the geographic extent of the data, alongside permissions for different audiences.
- Efficient storage – views don’t consume additional credits for feature storage.
How I approach creating view layers
Plan Access
I start by seeing who needs access and what level of interaction they require. For example, sharing an editable source layer with a small group of editors. Or, creating read-only views for wider audiences, such as the organisation or the public.
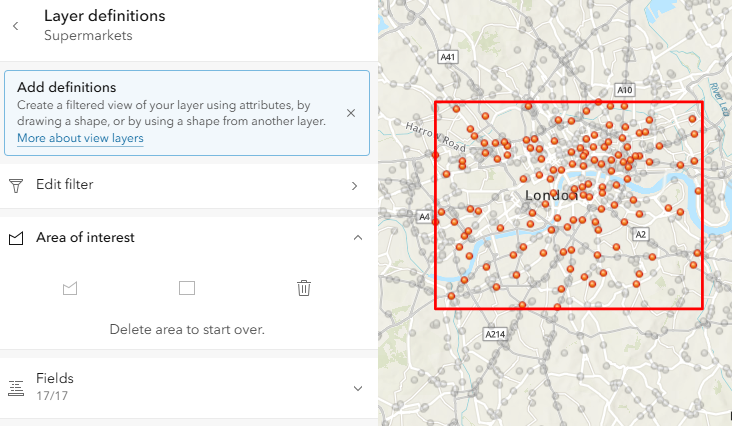
Use filters and areas of interest
Filters can be added to control which features appear in a view. I often exclude null values or filter by numeric ranges:

You can also limit the view to a specific geographic extent using polygons:
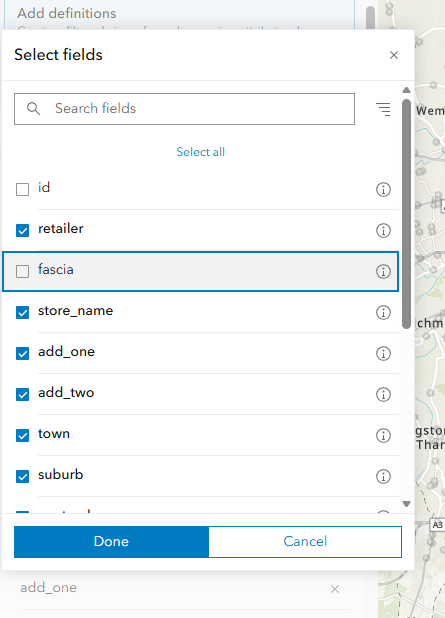
Hide sensitive fields
I always review the schema and remove unnecessary fields – especially personal information or internal codes. This protects privacy and simplifies the user experience.
Some things to watch for
Managing schema changes to the source layer
I worked with a team who wanted to delete a field in their source layer. They had lots of view layers based on that one source layer and when they removed the field, all those view layers broke. The view layers were referencing a schema that no longer existed.
How did we fix it? We restored the original schema by adding the field back, then planned a safer approach: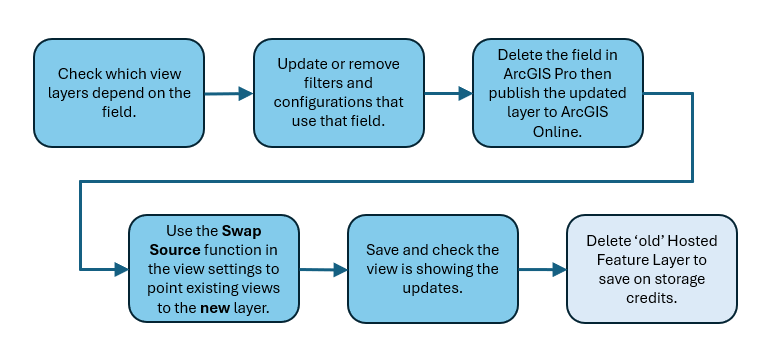
This ensured the views stayed functional without breaking. You can find out more about the Swap Source function here.
The experience taught me that schema changes ripple through every view. Always review dependencies before making edits to the source layer.
Overcomplicated filters
I’ve seen views become difficult to manage when filters are overly complex. Keeping them simple and logical makes maintenance easier.
Schema impacts
Creating a view updates the source layer’s schema date. If your workflows depend on schema timestamps, plan for this.
Relationships breaking
If your feature layer has relationships, layer numbers and relationship names must stay the same when updating or replacing the source layer. If these change, web maps or apps using those relationships will need updates.
Managing usage and performance
I regularly check if source layers have unused fields that inflate storage costs. Removing these fields can save credits. I also review usage patterns to ensure views meet user needs without unnecessary complexity.
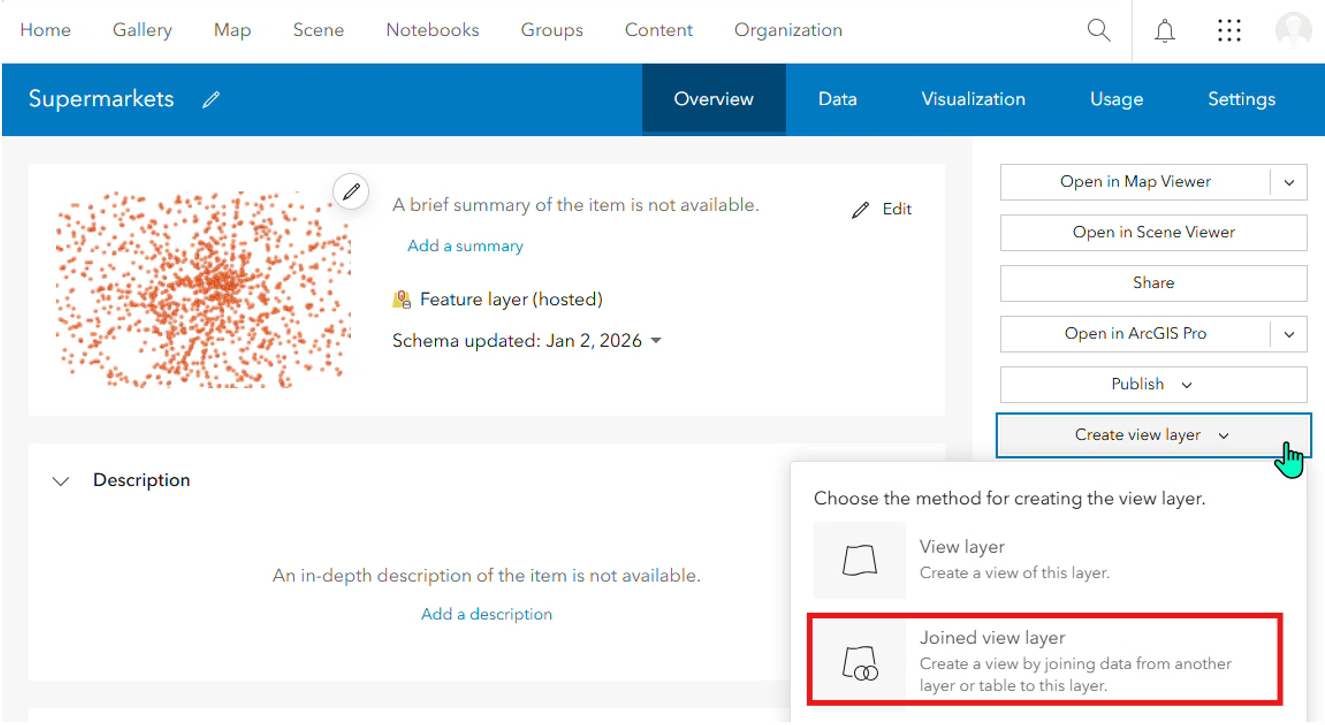
What about joined hosted feature view layers?
Using a joined view layer allows you to combine data from two hosted feature layers or from a layer and a table based on a shared attribute. I use them when I need to enrich data without duplicating it, for example linking administrative boundaries with datasets or joining tabular data to spatial features.
Why create joined view layers?
If your data is static and you want full control over layer settings, you might prefer creating a feature layer using the Join Features tool in Map Viewer or ArcGIS Pro. This gives you flexibility to edit and configure the layer as needed.
Joined view layers really shine when your data updates regularly. Because they dynamically reference the source layers (or tables), any changes flow through automatically. This means maps and apps using the joined view always display the latest data, without you having to republish anything. Another bonus is that joined view layers don’t cost any credits to create and don’t use extra storage because they act like virtual tables.
There are trade-offs though… Joined views are read-only, you can’t edit features directly, and you have less control over layer settings. The schema of the source layers becomes locked when a joined view is created, so plan ahead if you expect changes.
What I’ve learned
Working with hosted feature layer views has taught me a few key lessons.
Plan before you edit: schema changes affect every view linked to your source layer.
Keep it simple: filters and joins work best when they’re clear and logical.
Think long-term: views are powerful for sharing data, but they need maintenance, especially if your source layer evolves.
If you’re using views, take time to review your setup regularly. A little planning can save a lot of troubleshooting later!