While I was creating my Electric Vehicle charge maps, I realised that I had developed a workflow in ArcGIS Pro that could be repeated for any highway in Britain. A colleague suggested that I try recording and sharing my workflow in Tasks. I hadn’t come across Tasks before, but I was willing to give it a shot.
At first glance, Tasks looked unassuming – just a small pane in the ArcGIS Pro programme. And it seemed a little too straightforward – I wasn’t sure that this software wizard could handle my entire workflow. But after exploring the many capabilities of Tasks, I can attest that it’s a deceivingly powerful tool that’s ready to tackle complex workflows. And Tasks contain some exciting features that might surprise you (they definitely surprised me)!
In this blog, I’ll show you how easy it is to set up Tasks and configure some advanced Task features by walking you through the workflow I used to design my Electric Vehicle Charge Point maps.
But First…What are Tasks?
ArcGIS Pro Tasks are a series of steps that guide users through a sequential workflow in ArcGIS Pro from start to finish. With Tasks you can break down complex workflows into discrete steps to keep users on track. They are perfect for interactive workflows where your users make decisions and inputs, such as georeferencing land parcels or updating assets in a utility network. In addition, Tasks are highly configurable, allowing you to define a best practice workflow and share it with others in your organisation.

You can embed instructions, commands, and geoprocessing tools all within the Tasks pane in ArcGIS Pro. By embedding your workflow and tools, users can dive straight into their work without needing to hunt down tools within the software or needing to refer to a separate text document. With Tasks, you can also define how your map will operate during each step of the process by switching layers on and off, controlling which layers are selectable or editable, or by setting default parameters or environments for your analysis tools. You can even design your workflow so that all user actions can be completed entirely within the Tasks pane.
And that’s just a handful of Task’s great features. Rather than give you a laundry list of its capabilities, let’s get started on creating some Tasks, and I’ll stop by some of the exciting capabilities along the way.
Let’s Design Some Tasks
Creating Tasks is easy using the Task Designer in ArcGIS Pro. The Task Designer opens in a new window, where you can create new Tasks, configure new steps, and add detailed instructions for your users.
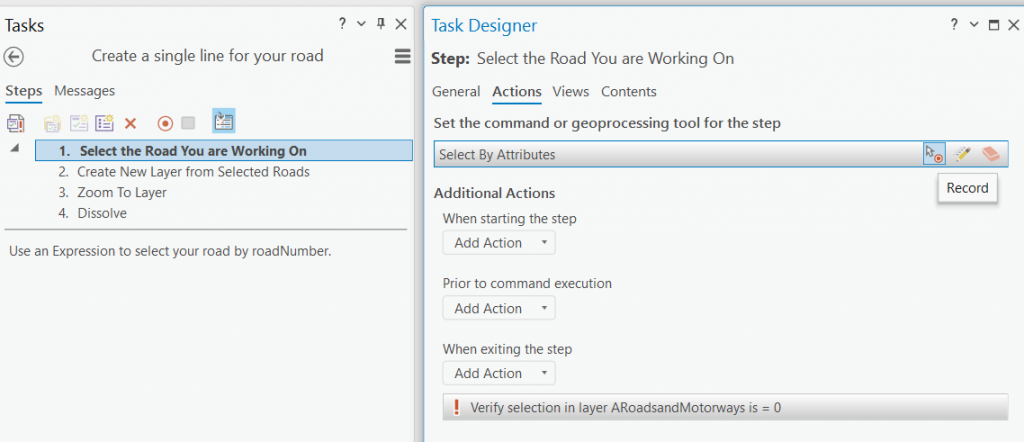
Thankfully, you don’t have to design your entire workflow by hand. With the Record Commands feature in Task Designer, all you need to do is hit record and the Task Designer will capture your entire workflow until you stop recording. Once you’re done recording, you can go back and edit each step to fine-tune its behaviour. Alternatively, you can record one step at a time, or search for your command or geoprocessing tool using the drop-down menu.
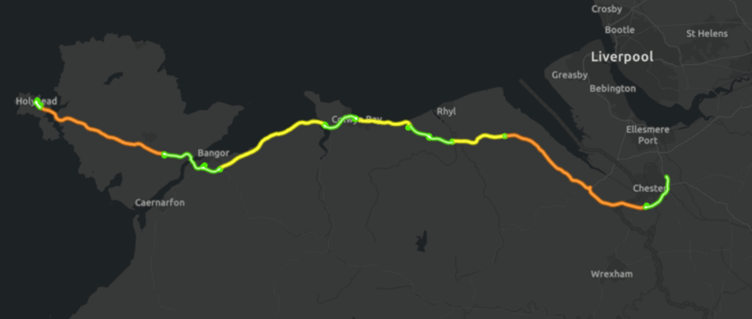
For the first Task in my project, I want my users to create a single polyline that represents the highway they wish to segment (for example, the A55). To do this, they will need to select out all the line segments that form the highway from a large dataset. Then they will need to dissolve this selection into a single feature.
Step verification keeps users on track
In the first step, I’ve instructed my users to write a simple expression to select their desired highway by its road number. However, once my users select their highway, I want to automatically create a new layer from their selection. To do so, I’ve enabled Step #2 to run automatically once the first step is complete. But before the new layer is created, I want the programme to stop and check whether their selection is correct. I don’t want my users to include any slip roads as part of the new layer, so I’ve configured a simple verification to run after they have performed their selection.
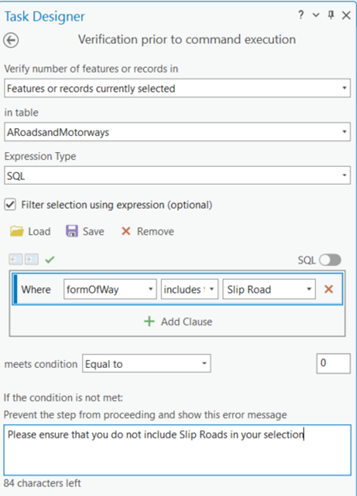
If the user forgets to remove slip roads from their selection, they’ll get my custom error message when they try to proceed on to the next step. Otherwise, the programme will go straight into creating the new layer on the map.
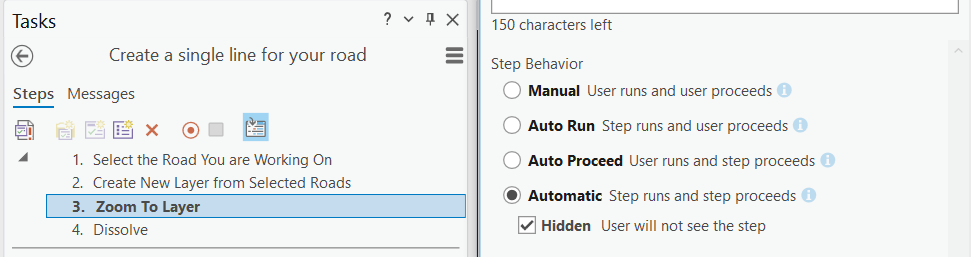
I’ve also included the command Zoom to Layer to run in the background – hidden from the user – so that the programme will jump to the new layer’s extent once it is drawn on the map.
Lastly, my users need to dissolve this new layer into a single feature for analysis in the second Task. To do this, I’ve embedded the Dissolve tool right within the Tasks Pane.

Once this step is run, my users will have a single line feature that’s ready for segmenting. First task complete!
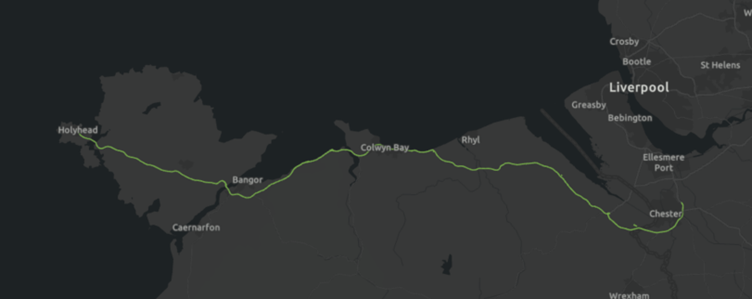
However, some of our eagle-eyed readers may have noticed that this first task can just as easily be automated. Once the user inputs their selection, each step can be run in succession with no further user inputs. Where Tasks really shine are in workflows that require both automation and interaction. In the second Task I’ll explore how custom palettes can streamline the interactive editing experience in ArcGIS Pro.
Streamline Editing with Custom Tool Palettes
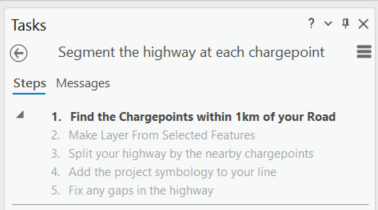
I now need my users to segment the new line by EV (electric vehicle) charge points that are within 1km of the highway. Sounds simple enough, but once my users run the Split Line at Point tool, they’ll need to clean up the highway to ensure the analysis is accurate.
Again, I’ve used the record commands function to copy my workflow into the Tasks Designer. I’ve then renamed a few of the steps to fit the project. Many of these steps are similar to those in the first task, so let’s jump ahead to Step #5: Fix any gaps in the highway.
The Split Line at Point tool is handy, but it has a little trouble with the roundabouts here in Britain, often splitting the line into several segments each time they appear. Similarly, after segmenting the road and adjusting the symbology to show the length of each segment, my users may notice some dangling line segments or small gaps in the highway. I want my users to manually inspect the newly segmented road and fix these errors.
Create tool palettes in the task designer
To do so, I can give my users a custom tool palette to perform their editing. I can right-click Step #5 and find Create New Palette. From here, I can select the editing tools for my users as well as control how the map will operate during the step.
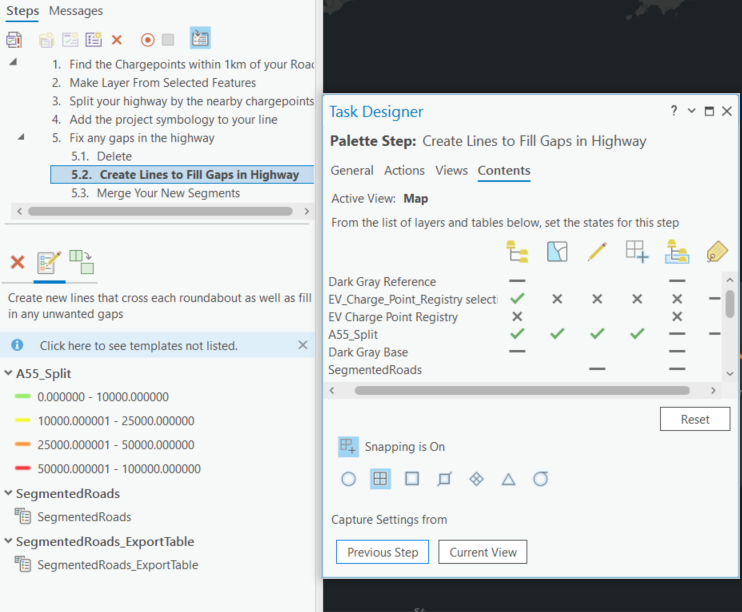
To clean up the highway, I want my users to be able to access the Delete, Edit, and Merge tools, but I only want them to edit the newly segmented highway and no other layers. To control this, I’ve opened the Contents tab in Task Designer and manually set the visibility, selectability, and editability of each layer in my map. In addition, I’ve turned on End-Snapping for the highway layer to ensure the newly created segments line up with existing features.
Let’s see how the palette appears to its users:
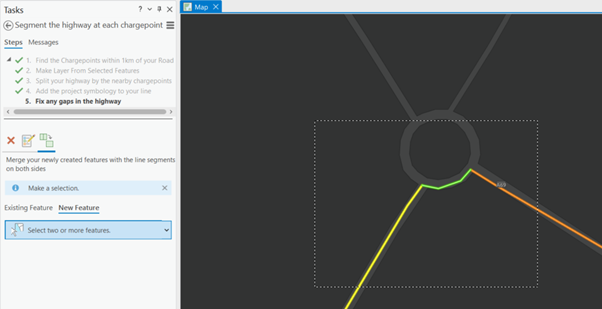
The custom tool palette makes users’ lives easier. Everything is ready to go, and there’s no fear that they will select or delete features from the wrong layer. Once they’re done inspecting and editing the highway, they’ll have segmented a new route.
 That’s Just the Beginning—Time to Start Sharing!
It looks like the Tasks are a success. I can now share them with my organisation, either as part of a project package or as a standalone .esriTasks file. By right-clicking your Tasks file in the Catalog pane, you can either save the Tasks file or send it directly in an e-mail to your colleagues.
I’ve asked my colleagues to segment a highway of their choice. Before doing so, I’ve turned on Task History in the project’s geodatabase, which allows me to track various metrics, such as which users are performing the tasks, which tasks were started or completed, and how long each task takes to complete. For this project, I want to see whether the task duration is consistent across various highways, so I’ve modified the Task History table to capture the Road Number from each user. From the Task History table, I can quickly create this neat chart: 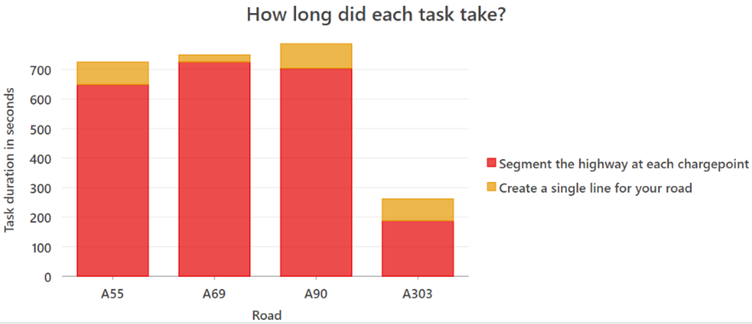
You can also track adoption rates, average duration of tasks, and how modifications to your tasks affect their efficiency. Digging into your Task History can help you identify the workflows that are running smoothly as well as those that need a little tweaking. For me, I need to look at why the A303 was significantly faster to complete.
I’m no longer a Task-sceptic
It’s features like the Task History that have sold me on Tasks. Initially a Task-sceptic, I’m now enamoured by its capabilities that make both a Task designer and a Task user’s lives easier – including the Record Commands feature, custom tool palettes, and step verification, or simply the ability to quickly mix and match automatic and interactive steps within one workflow.
And the workflow I shared is just the surface of what you can accomplish with ArcGIS Pro Tasks. Go out there and try recording a few of your own workflows in Task Designer and share them with a colleague, or two – maybe Tasks will win you over too!