Starting to code can be scary and while there are some learning resources available, they sometimes seem aimed at developers. As a complete beginner, this was a little bit daunting for me.
With this blog, I will show you how to create your first Notebook in ArcGIS Online.
What is an ArcGIS Notebook?
ArcGIS Notebooks can be created and used in ArcGIS Online, ArcGIS Pro, and ArcGIS Enterprise. ArcGIS Notebooks are built on top of Jupyter Notebooks and are optimised for spatial analysis. With ArcGIS Notebooks we can create and share documents containing Python code and text, as well as visualisations. You can document and automate your workflow and share it with others or use it later. Check out this resource to find out more.
If you want to dive deeper into why you would want to use ArcGIS Notebooks, read this blog.
Creating your first ArcGIS Notebook
Login to your ArcGIS Online account and click Notebook (found in the top bar). There are some Esri Sample Notebooks – you can use them as guidance when you work on future projects. These contain relatively advanced content, however, they show the broad capabilities you have with ArcGIS Notebooks.
If you have issues accessing the Notebook tab, please speak to your administrator, as they might have to enable access for you.
When clicking on New Notebook you will be presented with three options to choose from – these are for choosing your “runtime”. The runtime determines which Python libraries will be included in your Notebook and which libraries can be used, e.g. ArcPy is only included in Advanced runtimes. The runtimes also depend on the permissions you have, as well as the options available to your organisation. For our example we will use Standard (which does not require any credits to run).
You are now presented with your first Notebook. It is good to get in the habit of saving your Notebook now and giving it a title, some tags, and a summary. To do so click on the Save in the top right corner and select Save As.
Now that we are all set-up, let’s have a look at what the initial Notebook already displays.
Markdown
You can see that the Notebook contains text as well as code and an empty line at the bottom. Each line can either be of type Markdown or Code. Markdown is where you write your descriptions for your codes, and Code is the type of field you use for writing your code snippets.
For those that are completely new to coding, you might think: why is there text at all? Accompanying text is very important when coding. When you open a Notebook after a long time and you can’t remember what you have done, the text you added can help remind you what the code is doing. It is good practice to get into the habit of adding context to your code as you go along. This also helps others when you share your Notebook.
Connect to your content
The first line of code in your Notebook will connect you to your GIS. You need to run this cell in order to run any other code. Click Run – an asterisk will appear in the square brackets, and once executed a number will appear in the square brackets. As you execute your code the number in the brackets will go up every time.
As you progress in your Notebook, you will have to run all the code as you go or simply select Run All in the Cell column. For those that have worked with other Python Integrated Development Environments (IDEs), the code is executed from start to end. Whereas in ArcGIS Notebooks, it gets executed cell by cell.
Let’s have a closer look at the code that is already in the Notebook.
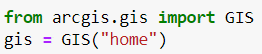
The from and the import are words in ArcGIS Notebooks that have a specific task behind them. What we are doing here is basically importing an object called GIS from a module called arcgis.gis. Then we create a variable called gis where we place the functionality of the object GIS. I know this sounds very confusing and it takes some time to get your head around, but I promise it gets easier over time.
The module that we have just called (arcgis.gis) is essential, because this is giving us access to GIS services using Python. Python libraries are organised into modules, which need to be imported in order to use them.
The object we called (GIS) is also important. This represents the GIS we are working with – i.e. ArcGIS Online.
So, what is the GIS(“home”) then? This connects us to our portal. In ArcGIS Online it will use “home” to act as the login credentials from the account we are logged in. If we were to use ArcGIS Enterprise for example, we would use a URL to connect it to the correct portal.
Creating your first map
Now that you have set-up your project, you are going to add some data from the Living Atlas and display it on a map. You can follow along here, or if you’d prefer, I’ve shared my Notebook publicly for those who want to download it and view it locally on their device or open it in ArcGIS Online if you have the correct permissions.
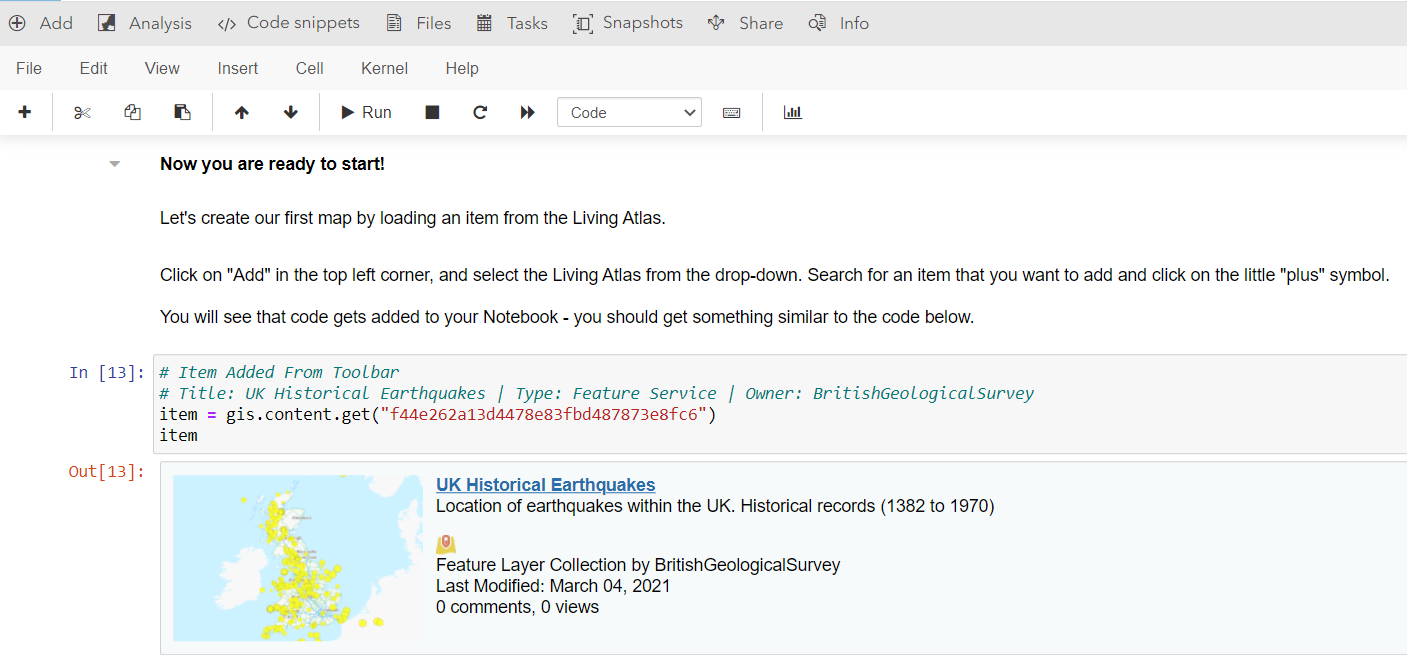
What does the above code do? First thing to notice are the “#” – these are used to comment text in your code. The item that has been added from the Living Atlas is stored in the variable “item” – you can change the name of this to anything you want. The default would be “item” and it is best practice to give your variables meaningful names, so you know what information they contain. The last line only contains the word “item” – this is where we call the element. This is what gives us the interactive output underneath the line of code.

Now that we have a dataset, we can create our first map! Since I am now creating a variable for the map, I decided to call it “item_map.” Our first map will be a reference map. “gis.map” is a method used to create a map widget which is centred at the location we have entered – in our case “UK.”
Now that we have the data and the map is centred to the location of our interest, we can bring the data on to the map. To do this you will use “.add_layer()”

We then call the the item_map again and after running the cell, you should be presented with your first map in ArcGIS Notebooks. Please note that once we have added the item, it will display in both maps that are showing in your Notebook. This is because we are referencing the same map in the display function.
Coding Tips
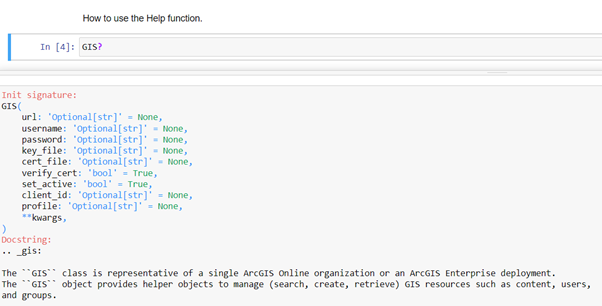
If you want to know more about an object you can use a ? after the object name and run that line of code. This triggers the help function which will give you more information on the object. Note that the help function is a great resource, however, it is aimed towards developers and hence might be hard to follow at the beginning.
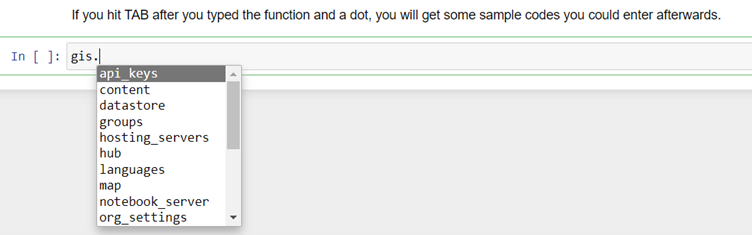
When you start writing your own code, hitting tab after the object brings up a drop-down with the properties and methods that the object comes with.
Now that we had a look at the basics that make up an ArcGIS Notebook, you are ready to take the next step and get coding yourself! Have a look at the Hello, Notebook! exercise and start your coding journey.
Additional Resources
This blog contains some great tips that will help you during your journey with ArcGIS Notebooks.
The ArcGIS API for Python is a Pythonic library for GIS related bits of code. It is used for performing GIS visualisations, administrative tasks in the GIS system, analysis as well as data management.
A short tutorial on how to get started with Notebooks in ArcGIS Pro if you would like to try using Notebooks in a different ArcGIS software.