ArcGIS Field Maps mobile app combines data collection, map viewing, and location tracking capabilities into a single app. The ArcGIS Field Maps web app was officially released in December 2020. The web app is designed to support the configuration of web maps before using them in the mobile app. If you are wondering what sort of configuration the web app allows you to do, you are in the right place, keep reading!
If you missed our blog about the Field Maps mobile app, you can find it here.
Accessing the web app
Similar to other apps available in ArcGIS Online/Portal, the Field Maps web app can be launched from the App Launcher window at the top-right corner of the website. If you’ve used the App Launcher since last December, you may have noticed the appearance of the new Field Maps icon. But if you didn’t, don’t worry! We know you’ve been busy using our other wonderful apps!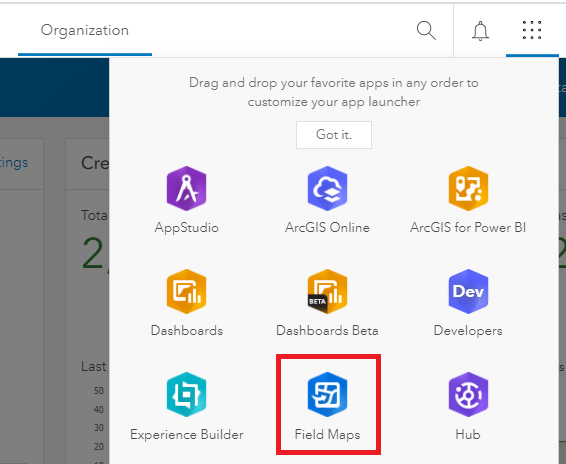
Once you’ve clicked on the icon, you will be redirected to the main page of the Field Maps web app. You can then select one of the web maps to start configuring it.
Tip: if you can’t see some web maps in the main page, make sure you are the owner of those web maps and that the option to Use in ArcGIS Field Maps Mobile is enabled from the web map settings page.
Hiding Maps in the mobile apps
One of the exciting capabilities is the ability to choose which maps to hide/keep when using the mobile app. This is handy if you want to tidy up the list of maps your mobile workers can see and access. For example, you can keep maps related to ongoing projects and hide those related to old projects.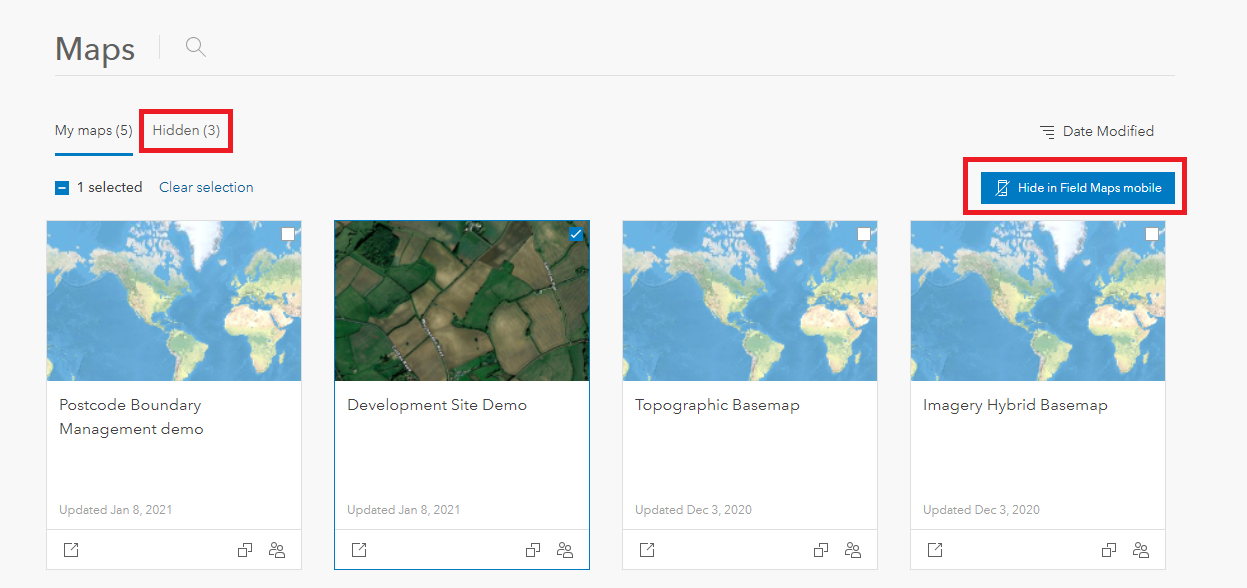
Configuring smart forms
Whilst the ArcGIS Field Maps mobile app provides a map-centric experience for mobile workers, it also introduces the ability to work with smart forms to streamline capturing non-spatial data. These smart forms are built upon existing web feature layers and are stored within your maps.
Tip: before configuring smart forms, think about the structure of the underlying feature layers – their attributes, domains, and relationships – as those will become the foundation of the forms.
Smart forms can be configured through the Form Builder in the Field Maps web app for all editable layers and related tables in your map. Many capabilities can be configured in the Form Builder. Let’s explore some of the key ones.
Group fields by placing common entries together. You can add a short description for each group and configure them to expand/collapse when the form is initially opened.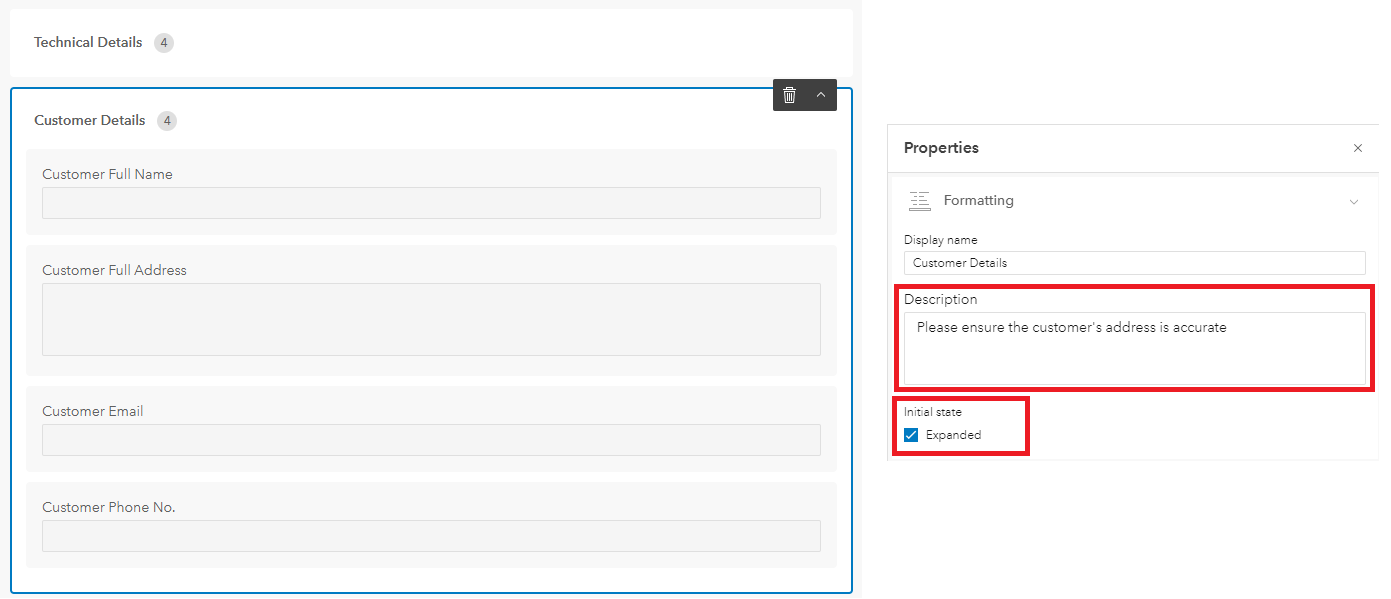
Format fields and control how they are displayed in the form. You can change the field display name and/or add a hint text to provide more information. Text input for text fields can be displayed as single-line or multi-line boxes and a min/max length can be set. For date fields, you can restrict the input to a range of dates, and control whether only Date or Date and Time inputs are required.
Set fields as Required. Required fields will appear with a * next to their display name. If those fields have no data entry, the mobile worker won’t be able to submit the form.
Mark fields as Read-only. A read-only field will appear in the form but it’ll be greyed out so the mobile workers can’t edit it. This is useful if you need to show reference information for the mobile workers while completing the form.
Set Conditional Visibility for fields or groups. This allows you to display certain fields/groups based on the entry values of previous fields. It can be configured by defining a conditional Arcade expression for each question/group.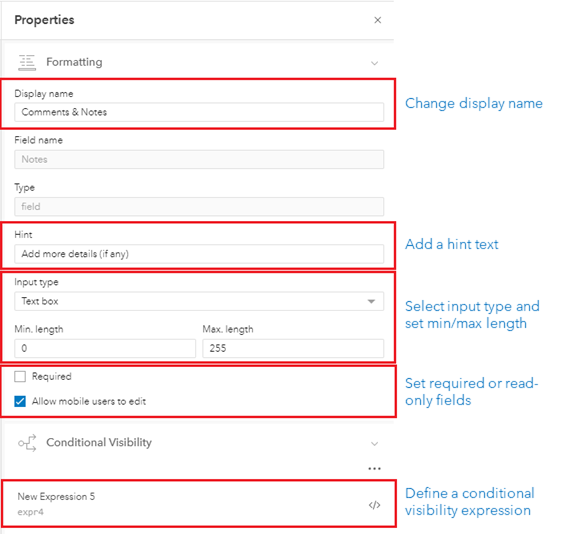
All these exciting capabilities are now available and can be configured in the Field Maps web app. In the future, there will be more capabilities added to smart forms. This includes; providing additional control of relationships and attachments, calculating attribute values automatically, setting attribute rules to restrict invalid edits, and configuring contingent values (to show certain values in one field depending on values in another field).
Tip: If you need to make any adjustments to the web maps that have forms configured and stored within them, use the new Map Viewer Beta as this reads and understands the form properties (they are both built using the 4.x JavaScript API). Opening and saving web maps in the current Map Viewer will result in deleting the form, so care should be taken after configuring your forms.
Smart forms in Field Maps vs. Survey123
By now, you are probably thinking that smart forms already exist in Survey123 and you are probably wondering which solution to deploy. The short answer is that it depends on your workflow requirements and whether the mobile workers need to capture data using a map-centric or form-centric app. If we exclude the extra capabilities you get in Field Maps (i.e. map mark-ups and location tracking), smart forms in Field Maps can be considered as a simpler version of those in Survey123. They offer similar capabilities to those available in the Survey123 Web Designer but if you use the XLSForm specification, then Survey123 Connect provides you with many advanced capabilities.
Working with templates
Perhaps you are familiar with the term Feature templates? If not, these define the categories of items that mobile workers are allowed to add to a feature layer, based on specific combinations of attributes. These templates can be created when preparing web maps for data collection.
It’s exciting to know that you can now manage feature templates in the Field Maps web app. The web app inherits the same templates configured in the web map and allows you to edit them. You can change the templates’ display name, add a description and define default values.
Tip: if you need to create a new template based on an existing one, duplicate the existing template in the Field Maps web app, then modify it to suit your requirements.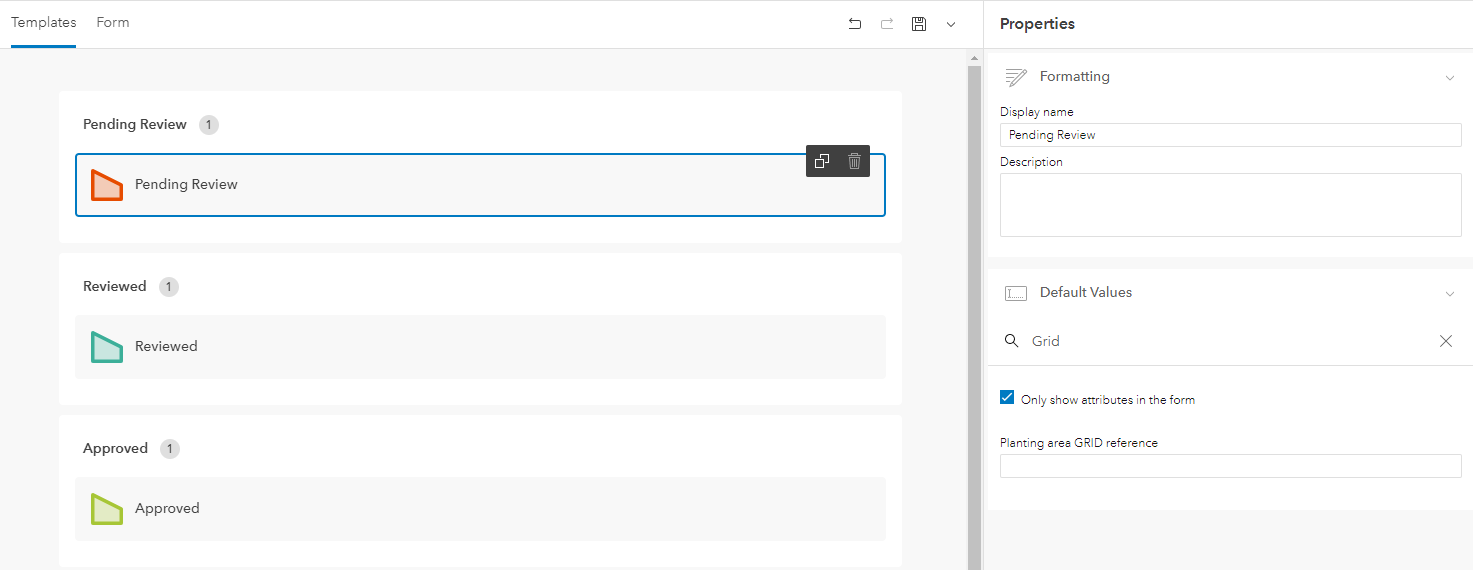
Managing offline content
Enabling offline mode allows you to download maps onto your mobile device to use them in locations where there may be no internet connectivity. Typically, to enable offline mode for a web map, you’ll need to configure the offline settings in the Settings page of the web map. This includes; enabling the offline mode, creating offline map areas, controlling what’s downloaded to the mobile device, and defining tile packages to use as basemaps.
The good news is that all these settings can also be configured and managed through the Field Maps web app. An additional feature the web app provides, that I found particularly useful, is the ability to highlight which layers are preventing the map from being taken offline. If one or many layers aren’t enabled for offline mode (e.g. Sync is disabled), a warning message will appear highlighting which layer requires attention. Also, the radio button to enable offline mode for the web map will be greyed out until all layers have their offline mode enabled.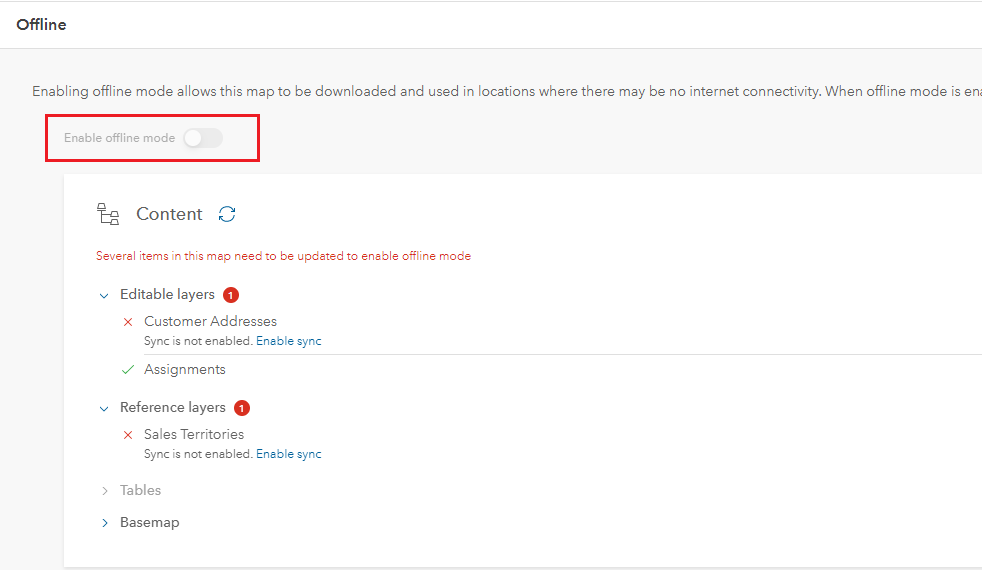
If you want to read more about the Field Maps web app, this blog outlines how to configure maps for the field. Or you could follow the short modules in this learning path. Otherwise, go ahead and start configuring your maps!